m (Reverted edits by Kirk Jason Beltran (talk | block) to last version by RainingPain17) |
No edit summary |
||
| (2 intermediate revisions by 2 users not shown) | |||
| Line 8: | Line 8: | ||
|fail = [[Wasted]]<br>[[Dave Norton|Dave]] dies<br>[[Steve Haines|Steve]] dies<br>[[Cargobob]] destroyed |
|fail = [[Wasted]]<br>[[Dave Norton|Dave]] dies<br>[[Steve Haines|Steve]] dies<br>[[Cargobob]] destroyed |
||
|protagonists = [[Michael De Santa]]<br>[[Trevor Philips]]<br>[[Franklin Clinton]] |
|protagonists = [[Michael De Santa]]<br>[[Trevor Philips]]<br>[[Franklin Clinton]] |
||
| − | |reward = Michael has his [[Tailgater]] returned (with modifications)<br>Trevor and Michael can |
+ | |reward = Michael has his [[Tailgater]] returned (with modifications)<br>Trevor and Michael can re-enter Los Santos<br>[[Stun Gun]] now available in [[Ammu-Nation]] (if [[The Civil Border Patrol]] not already completed) |
|unlocks = [[Hang Ten]] |
|unlocks = [[Hang Ten]] |
||
|unlockedby = [[Derailed]]}} |
|unlockedby = [[Derailed]]}} |
||
| Line 18: | Line 18: | ||
==Description== |
==Description== |
||
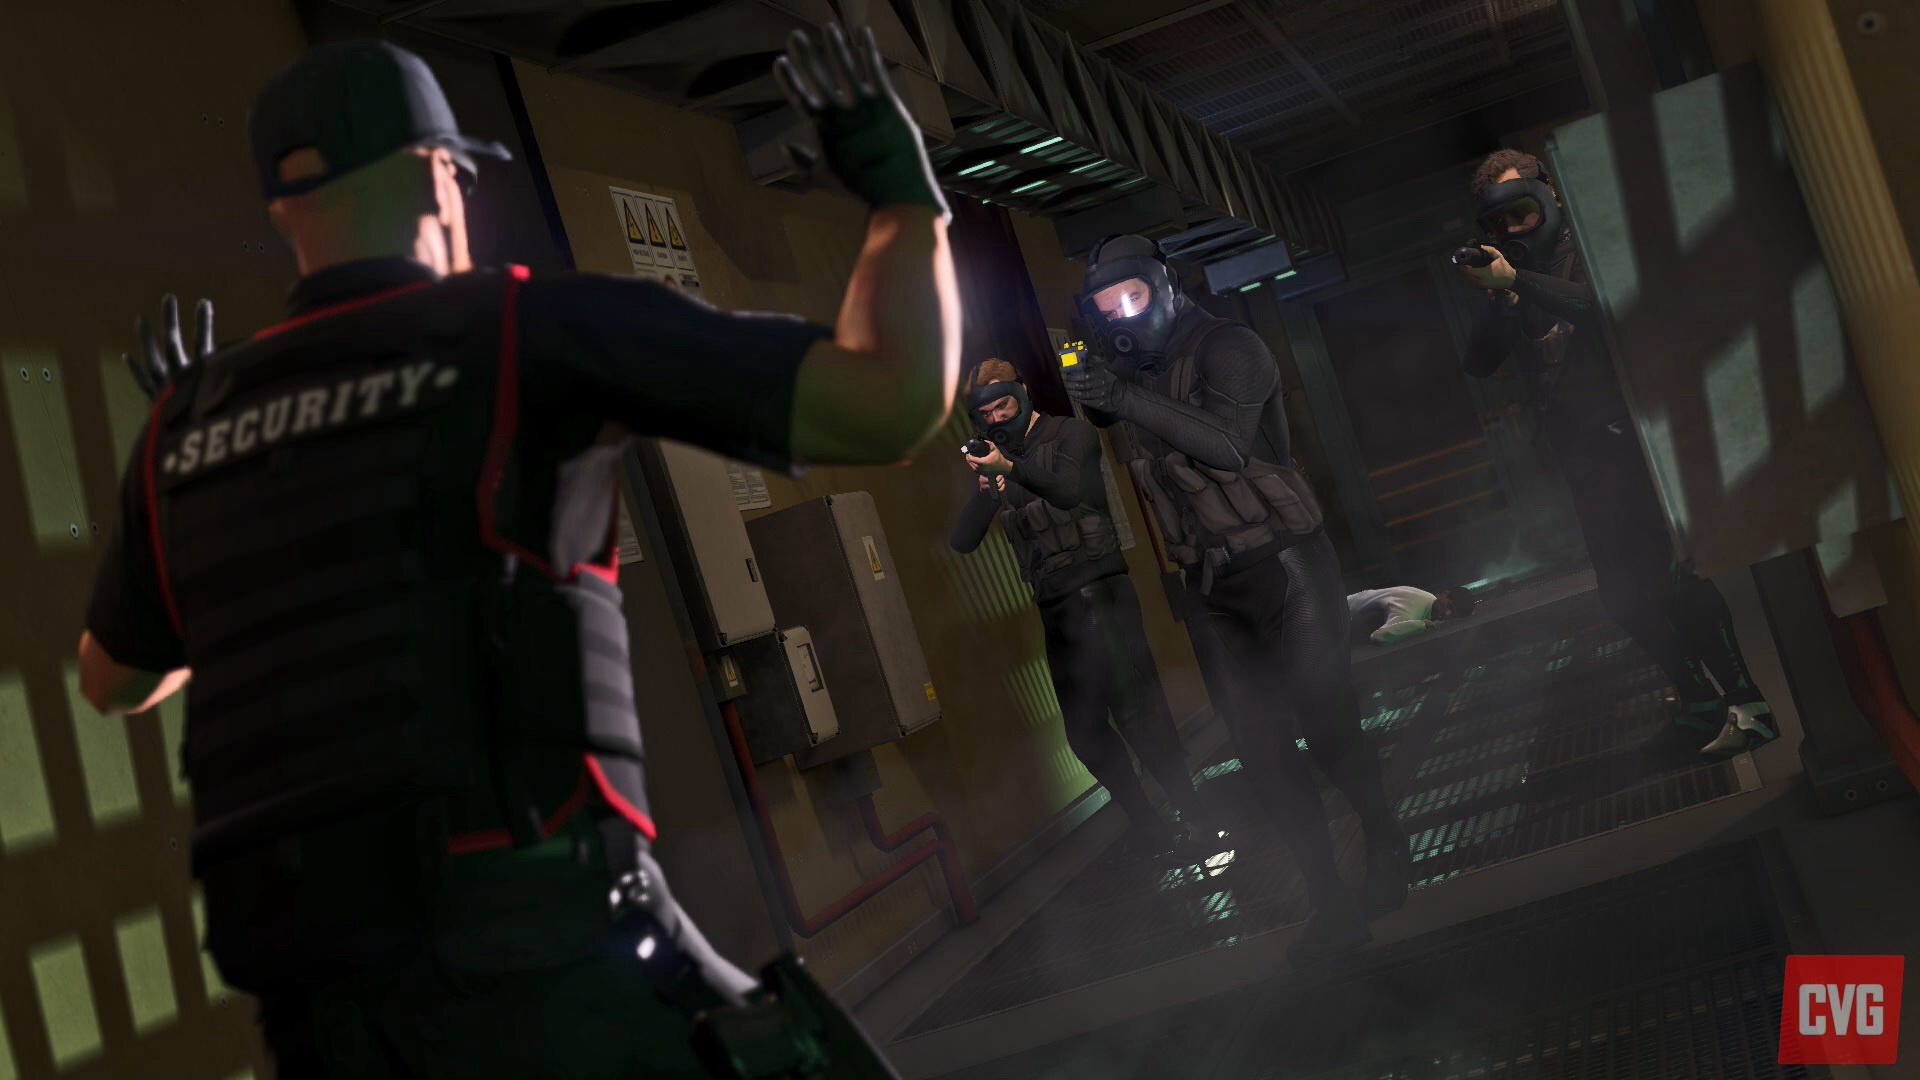
Michael, Franklin, and Trevor meet at [[Cape Catfish]]. Soon, Steve and [[Dave Norton]] arrive. Steve wants the protagonists to steal a chemical weapon from the [[Humane Labs and Research]], an [[IAA]] research facility. Due to a lack of manpower, Steve and Dave join the caper. Steve instructs Trevor and Franklin to handle transport, while Michael joins Steve and Dave in infiltrating the lab. |
Michael, Franklin, and Trevor meet at [[Cape Catfish]]. Soon, Steve and [[Dave Norton]] arrive. Steve wants the protagonists to steal a chemical weapon from the [[Humane Labs and Research]], an [[IAA]] research facility. Due to a lack of manpower, Steve and Dave join the caper. Steve instructs Trevor and Franklin to handle transport, while Michael joins Steve and Dave in infiltrating the lab. |
||
| + | [[File:MonkeyBusiness-GTAV-next2.jpg|thumb|Infiltrating the facility in the enhanced version.]] |
||
| − | |||
Michael, Steve, and Dave, dressed in [[Scuba Suit|scuba suits]], take a [[Dinghy]] down the [[San Andreas (HD Universe)|San Andreas]] coast to a spot near Humane Labs and Research. The three dive and approach an underwater exhaust shaft; to gain entry, the player as Michael must use a torch to cut loose a grate over the shaft's access point. Once inside, the three swim through the shaft until they reach the interior of the lab. From there, the three advance through the halls. Michael is armed with a [[Stun Gun|stun gun]] and is responsible for taking out the scientists and other employees encountered along the way. |
Michael, Steve, and Dave, dressed in [[Scuba Suit|scuba suits]], take a [[Dinghy]] down the [[San Andreas (HD Universe)|San Andreas]] coast to a spot near Humane Labs and Research. The three dive and approach an underwater exhaust shaft; to gain entry, the player as Michael must use a torch to cut loose a grate over the shaft's access point. Once inside, the three swim through the shaft until they reach the interior of the lab. From there, the three advance through the halls. Michael is armed with a [[Stun Gun|stun gun]] and is responsible for taking out the scientists and other employees encountered along the way. |
||
| + | [[File:MonkeyBusiness-GTAV-next.jpg|thumb|300px|The mission in the enhanced version.]] |
||
| − | |||
Soon, the three reach their destination. After convincing a scientist to open the lab door, Michael is able to grab the chemical weapon. An alarm is triggered and armed security guards begin to appear. Michael and the two FIB agents push through to the lab's garage area (Michael is now encouraged to use his regular arsenal). Outside is a refrigeration unit meant to transport the chemical weapon; Michael places the weapon in this container. |
Soon, the three reach their destination. After convincing a scientist to open the lab door, Michael is able to grab the chemical weapon. An alarm is triggered and armed security guards begin to appear. Michael and the two FIB agents push through to the lab's garage area (Michael is now encouraged to use his regular arsenal). Outside is a refrigeration unit meant to transport the chemical weapon; Michael places the weapon in this container. |
||
| Line 68: | Line 68: | ||
*If the player fails the mission by spooking Madrazo's men, then the mission fail message will incorrectly spell Madrazo as "Madrazzo". |
*If the player fails the mission by spooking Madrazo's men, then the mission fail message will incorrectly spell Madrazo as "Madrazzo". |
||
*Rarely, a glitch can happen where after you reach the surface of the water and try to climb the ladder, Michael will automatically slide down the ladder every time making it impossible to progress the mission. The only way is to reload your last save because you can't fail this mission no matter what you try in this part of this mission. |
*Rarely, a glitch can happen where after you reach the surface of the water and try to climb the ladder, Michael will automatically slide down the ladder every time making it impossible to progress the mission. The only way is to reload your last save because you can't fail this mission no matter what you try in this part of this mission. |
||
| − | *The [[Jetsam]] [[Cargobob]] can be obtained in this mission, the Jetsam edition of the Cargobob is rare, because the chopper is in white and red, while the Cargobob only comes in two variants: Camo, and black. It also doesn't have the Sea Stallion (part of what the Cargobob was made from) "buff" in the front. It can be obtained by first dropping the container on the trailer, and NOT landing the Cargobob in the given location. And try to shove the [[Frogger]] off the helipad, but be warned it may explode. After the Frogger is off the helipad, land the Jetsam Cargobob, and kill yourself (as Trevor.) And when it says to replay this mission, select no, and then when you are recovered from the hospital, RUN to the Sandy Shores air field |
+ | *The [[Jetsam]] [[Cargobob]] can be obtained in this mission, the Jetsam edition of the Cargobob is rare, because the chopper is in white and red, while the Cargobob only comes in two variants: Camo, and black. It also doesn't have the Sea Stallion (part of what the Cargobob was made from) "buff" in the front. It can be obtained by first dropping the container on the trailer, and NOT landing the Cargobob in the given location. And try to shove the [[Frogger]] off the helipad, but be warned it may explode. After the Frogger is off the helipad, land the Jetsam Cargobob, and kill yourself (as Trevor.) And when it says to replay this mission, select no, and then when you are recovered from the hospital, RUN to the Sandy Shores air field (do not drive or take a cab) and the chopper should still be there, like you left it, and it can be saved on the helipad, provided the player doesn't change helicopters, or the Jetsam Cargobob will disappear. This method also works with the Cargobob stolen from the military base, (if the player chose in [[The Merryweather Heist]] the Offshore option) although doesn't involve killing yourself, just land on the helipad, get out of the Cargobob, and run away. |
*While traveling through the secret passage, Michael says that he feels like he's giving the [[Statue of Happiness]] a colonoscopy. |
*While traveling through the secret passage, Michael says that he feels like he's giving the [[Statue of Happiness]] a colonoscopy. |
||
*The entry duct underwater will have a secondary grate put over it after the mission to prevent the player from entering the facility again. |
*The entry duct underwater will have a secondary grate put over it after the mission to prevent the player from entering the facility again. |
||
*Michael can call [[Solomon Richards]] after this mission, to tell him that he is back in [[Los Santos (HD Universe)|Los Santos]]. |
*Michael can call [[Solomon Richards]] after this mission, to tell him that he is back in [[Los Santos (HD Universe)|Los Santos]]. |
||
*[[Patricia Madrazo]] will make her first call to Trevor right after this mission. |
*[[Patricia Madrazo]] will make her first call to Trevor right after this mission. |
||
| − | * If you replay this mission as Franklin or Trevor, Michael will always have |
+ | * If you replay this mission as Franklin or Trevor, Michael will always have his default grey suit (dirty though). However, if you replay as Michael, he will have the same clothing as he had when you replayed the mission. |
*When asked by Franklin, Michael says he has had no contact with his family, despite the fact that Michael can return Tracey's emails when she sends them. This is likely a developer oversight. |
*When asked by Franklin, Michael says he has had no contact with his family, despite the fact that Michael can return Tracey's emails when she sends them. This is likely a developer oversight. |
||
*There is no special dialogue if you run out of fuel for the cutter, the mission simply fails. |
*There is no special dialogue if you run out of fuel for the cutter, the mission simply fails. |
||
Revision as of 22:54, 8 November 2014
Monkey Business is a mission in Grand Theft Auto V, given by FIB agent Steve Haines to protagonists Michael De Santa, Trevor Philips and Franklin Clinton.
Description
Michael, Franklin, and Trevor meet at Cape Catfish. Soon, Steve and Dave Norton arrive. Steve wants the protagonists to steal a chemical weapon from the Humane Labs and Research, an IAA research facility. Due to a lack of manpower, Steve and Dave join the caper. Steve instructs Trevor and Franklin to handle transport, while Michael joins Steve and Dave in infiltrating the lab.

Infiltrating the facility in the enhanced version.
Michael, Steve, and Dave, dressed in scuba suits, take a Dinghy down the San Andreas coast to a spot near Humane Labs and Research. The three dive and approach an underwater exhaust shaft; to gain entry, the player as Michael must use a torch to cut loose a grate over the shaft's access point. Once inside, the three swim through the shaft until they reach the interior of the lab. From there, the three advance through the halls. Michael is armed with a stun gun and is responsible for taking out the scientists and other employees encountered along the way.
The mission in the enhanced version.
Soon, the three reach their destination. After convincing a scientist to open the lab door, Michael is able to grab the chemical weapon. An alarm is triggered and armed security guards begin to appear. Michael and the two FIB agents push through to the lab's garage area (Michael is now encouraged to use his regular arsenal). Outside is a refrigeration unit meant to transport the chemical weapon; Michael places the weapon in this container.
The player is shifted to Trevor flying the Cargobob Steve purchased with the money taken in The Paleto Score. Trevor lowers the Cargobob over the refrigeration unit. However, Steve suddenly insists that the heat is too great and that they call off the operation. Michael argues. Steve soon relents. He runs back into the lab's garage; there, he shoots himself in the leg, then presents himself as a hero to the arriving security agents. However, the United Liberty Paper Contact doesn't buy it and orders Haines to be detained.
With refrigeration unit in tow, Trevor flies to Sandy Shores Airfield, lowers the container onto a waiting Flatbed, then lands the helicopter. Franklin and Michael confer with Dave, who then leaves with the semitruck. After Dave is gone, Michael checks his phone and sees that Martin Madrazo has accepted as apology the artifact Michael and Trevor stole in the mission Derailed. Michael celebrates with Franklin, excited that he can finally return to Los Santos
The player is shifted to Trevor as he drives Patricia back to her husband. The radio in Trevor's Bodhi is automatically set to Los Santos Rock Radio, with "If You Leave Me Now" by Chicago setting the appropriate mood. As they drive, Patricia tells the crying Trevor that she will miss him but that this is for the best. Trevor leaves Patricia at Madrazo's mansion at La Fuente Blanca, but not before threatening a clearly frightened Martin. At this point, the mission ends.
Mission Objectives
- Navigate down to the coast line. - (Michael)
- Gain entry to the lab. - (Michael)
- Go to the elevator. - (Michael)
- Incapacitate the lab workers. - (Michael)
- Take cover from the security guards. - (Michael)
- Get the nerve toxin. - (Michael)
- Take out the security guards. - (Michael)
- Put the nerve toxin into the refrigeration unit. - (Michael)
- Collect the container. - (Trevor)
- Fly to the airfield. - (Trevor)
- Land the crate on the trailer. - (Trevor)
- Land the helicopter. - (Trevor)
- Drive Patricia to the farm house. - (Trevor)
Gold Medal Objectives
- Stunner - Stun 8 enemies with the Stun Gun.
- Headshots - Kill 15 enemies with a headshot.
- Accuracy - Finish with a shooting accuracy of at least 70%.
- Time - Complete within 13:30.
Aftermath
- Completing the mission removes the restriction on Trevor and Michael reentering Los Santos. Michael's mansion is reactivated as a safehouse. However, entering Floyd's Apartment will trigger the Hang Ten mission. Also, vehicles parked in the apartment's driveway will have vanished. Trevor's Trailer continues to be a safehouse for Trevor, but can no longer be accessed by Michael for this purpose.
- After this mission, Michael's default vehicle once again becomes the Tailgater, however (as indicated in an e-mail Michael receives from Jimmy) the vehicle has now undergone extensive modifications and as such is a more powerful vehicle than before. It has also been modified to look more like a racer car with dollar wheels, window tints and bumper upgrades. Any respray will be undone and the car will retain it's original black colour. The player can still change the car.
- Trevor will receive a brief phone call from Patricia soon after she is dropped off.
Weazel News Newspaper
"A violent break in at a biotech lab in the San Chianski Mountains ended in bloodshed, mayhem and the loss of a formula for cheap perfume. The meticulously planned raid appears to have been carried out by highly skilled professionals, as thieves swam into the facility using diving equipment to access an underwater drainage pipe. Several research scientists and security personnel were killed at the facility which has been attacked by animal welfare activists in the past. The facility was once believed to have been a testing center for chemical and biological weapons, but those rumors have long been dispelled and now the facility tests soaps, high tech face creams and cosmetics. Agents are baffled as to the scale of the raid, as the perfume formula stolen was not considered particularly valuable."
Lifeinvader Posts
- Tracey De Santa - "Hope you're taking care of yourself, Dad. I know what a magnet for absolute chaos you are."
- Amanda De Santa - "I hope none of this stuff I'm seeing on the news has anything to do with you."
- Tracey De Santa - "If it makes you feel any better, Fabien is a real douchelord."
Trivia
- It is later revealed via a Weazel News radio broadcast that the "dangerous chemicals" were really a new recipe for "cheap perfume" (though this is likely a cover story).
- However, it is to be noted that after the chemicals are delivered to the trailer, Michael says that "...It could be shaving cream for all I know."
- If the player fails the mission by spooking Madrazo's men, then the mission fail message will incorrectly spell Madrazo as "Madrazzo".
- Rarely, a glitch can happen where after you reach the surface of the water and try to climb the ladder, Michael will automatically slide down the ladder every time making it impossible to progress the mission. The only way is to reload your last save because you can't fail this mission no matter what you try in this part of this mission.
- The Jetsam Cargobob can be obtained in this mission, the Jetsam edition of the Cargobob is rare, because the chopper is in white and red, while the Cargobob only comes in two variants: Camo, and black. It also doesn't have the Sea Stallion (part of what the Cargobob was made from) "buff" in the front. It can be obtained by first dropping the container on the trailer, and NOT landing the Cargobob in the given location. And try to shove the Frogger off the helipad, but be warned it may explode. After the Frogger is off the helipad, land the Jetsam Cargobob, and kill yourself (as Trevor.) And when it says to replay this mission, select no, and then when you are recovered from the hospital, RUN to the Sandy Shores air field (do not drive or take a cab) and the chopper should still be there, like you left it, and it can be saved on the helipad, provided the player doesn't change helicopters, or the Jetsam Cargobob will disappear. This method also works with the Cargobob stolen from the military base, (if the player chose in The Merryweather Heist the Offshore option) although doesn't involve killing yourself, just land on the helipad, get out of the Cargobob, and run away.
- While traveling through the secret passage, Michael says that he feels like he's giving the Statue of Happiness a colonoscopy.
- The entry duct underwater will have a secondary grate put over it after the mission to prevent the player from entering the facility again.
- Michael can call Solomon Richards after this mission, to tell him that he is back in Los Santos.
- Patricia Madrazo will make her first call to Trevor right after this mission.
- If you replay this mission as Franklin or Trevor, Michael will always have his default grey suit (dirty though). However, if you replay as Michael, he will have the same clothing as he had when you replayed the mission.
- When asked by Franklin, Michael says he has had no contact with his family, despite the fact that Michael can return Tracey's emails when she sends them. This is likely a developer oversight.
- There is no special dialogue if you run out of fuel for the cutter, the mission simply fails.
- Humorously, in the cooling tunnel, Michael hints to the fact that he urinated in the water. To his benefit, Steve and Dave do not notice.
- This mission has several references to the Metal Gear Solid franchise:
- Michael infiltrates the research facility by entering the exhaust shaft underwater. This is a reference to how Solid Snake entered Shadow Moses island in Metal Gear Solid and how Raiden entered the Big Shell via underwater in Metal Gear Solid 2: Sons Of Liberty.
- Michael cuts the grate in order to enter the labs. This is a reference to how Solid Snake cut a hole in the Big Shell's oil fence in Metal Gear Solid 2: Sons Of Liberty.
- Michael is using a Stun Gun in this mission for non lethal methods. MGS franchise features tranquilizer guns used by the player to put enemies to sleep in order to not kill them. Dave Norton also says "Put the humanitarians to sleep Michael", referencing to how the tranquilizer gun from the Metal Gear Solid series puts enemies to sleep.
- This mission requires an access card from a scientist to open a certain door. This is a reference to how Solid Snake and Raiden used access cards in order to open certain doors in Metal Gear Solid and Metal Gear Solid 2: Sons Of Liberty.