(Added "Stun Knockout" to the "Fists" article) |
No edit summary Tag: rte-source |
||
| (20 intermediate revisions by 13 users not shown) | |||
| Line 1: | Line 1: | ||
| + | {| class="wikitable floatright" style="border: 2px solid #444444; background-color:#111111; font-size: 85%;" |
||
| − | [[File:LittleJacob-GTAIV-guns.jpg|thumb|194px|[[Little Jacob]] selling guns to Niko]] |
||
| + | |width=240|[[File:LittleJacob-GTAIV-guns.jpg|240px]] |
||
| − | '''[[Weapons]]''' play a major role in ''[[Grand Theft Auto IV]]'', with a total of 15 in the game. As with previous titles, they can be found in random locatons across [[Liberty City (HD Universe)|Liberty City]], and can also be purchased from underground gun shops, dropped by NPCs, and given to the player in missions. |
||
| + | The player can buy weapons through [[Little Jacob]] |
||
| + | |} |
||
| + | |||
| + | '''[[Weapons]]''' play a major role in ''[[Grand Theft Auto IV]]'', with a total of 15 in the game. As with previous titles, they can be found in random locations across [[Liberty City (HD Universe)|Liberty City]], and can also be purchased from underground gun shops, dropped by NPCs, and given to the player in missions. |
||
Unlike previous titles, the weapons in ''GTA IV'' have two strength tiers instead of the usual three. Also there are no model names for weapons (For example, M4A1 is called Carbine Rifle). Also, weapons spawned in the map or dropped by an NPC will not float in the air, like in previous installments; they will instead lie on the ground and emit a slight orange glow, in order to be more noticeable to the player. Dropped guns act like any other interactable prop in the game; they can be moved if anything touches them (vehicle, NPCs, bullets, etc.) |
Unlike previous titles, the weapons in ''GTA IV'' have two strength tiers instead of the usual three. Also there are no model names for weapons (For example, M4A1 is called Carbine Rifle). Also, weapons spawned in the map or dropped by an NPC will not float in the air, like in previous installments; they will instead lie on the ground and emit a slight orange glow, in order to be more noticeable to the player. Dropped guns act like any other interactable prop in the game; they can be moved if anything touches them (vehicle, NPCs, bullets, etc.) |
||
| Line 6: | Line 10: | ||
==Dealers== |
==Dealers== |
||
[[File:UndergroundGunShop-GTAIV-Broker.jpg|thumb|220px|One of the city's underground gun stores.]] |
[[File:UndergroundGunShop-GTAIV-Broker.jpg|thumb|220px|One of the city's underground gun stores.]] |
||
| − | Much like the real New York City, the civilian sale and ownership of firearms in [[Liberty City |
+ | Much like the real New York City, the civilian sale and ownership of firearms in [[Liberty City (HD Universe)|Liberty City]] is illegal. Keeping in line with the political reality satirized by the game, the [[Ammu-Nation]] shops found in previous GTAs have been closed down due to the strict laws imposed by the mayor. Taking their place, however, are a number of shady, [[Underground Gun Shops|underground gun shops]] located in basements and alleys around the city. Niko is introduced to these shops by [[Dimitri Rascalov]] in the mission [[Do You Have Protection?]] |
| − | Additionally, if Niko has earned enough respect with [[Little Jacob]] through friend activities, the player has the option to call him to meet up nearby with a vehicle full of weapons at discounted prices |
+ | Additionally, if Niko has earned enough respect with [[Little Jacob]] through friend activities, the player has the option to call him to meet up nearby with a [[Virgo|vehicle]] full of weapons at discounted prices. |
Unlike prior games, the player does not need to purchase multiple instances of firearms to stock up on ammunition. Instead, the player buys one gun for a high price and pays a much smaller amount for each additional magazine or round. However, the player now has a limit on how much ammunition he can carry for each weapon. This limit is removed upon reaching [[100% in GTA IV|100% completion]]. |
Unlike prior games, the player does not need to purchase multiple instances of firearms to stock up on ammunition. Instead, the player buys one gun for a high price and pays a much smaller amount for each additional magazine or round. However, the player now has a limit on how much ammunition he can carry for each weapon. This limit is removed upon reaching [[100% in GTA IV|100% completion]]. |
||
| − | == |
+ | ==Melee== |
| + | ====Fist==== |
||
| − | * '''Type''' - Weapon's type (also as the hot-key of PC version). |
||
| + | {| class="wikitable" |
||
| − | * '''Cost''' - Prices of weapons and ammo for the gun stores and friend contacts. |
||
| − | * '''Magazine''' - The number of rounds that can be fired before the need to reload. |
||
| − | * '''Carrying capacity''' - The maximum number of ammo the player is able to carry. |
||
| − | * '''Drive-by''' - Able to use in a vehicle. |
||
| − | * '''Rate of Fire'''- The number of bullets this weapon can shot in one minute. |
||
| − | |||
| − | {| class="wikitable" style="border-style: solid; border-width: 1px; border-spacing: 1; background-color:#222222; text-align:center; background-color:#000000;" |
||
| − | |rowspan="3"| |
||
| − | |rowspan="3" style="vertical-align:middle"|'''Type''' |
||
| − | |colspan="6"|'''Cost''' |
||
| − | |rowspan="3" style="vertical-align:middle"|'''Magazine<br />size''' |
||
| − | |rowspan="3" style="vertical-align:middle"|'''Carrying<br />capacity''' |
||
| − | |rowspan="3" style="vertical-align:middle"|'''Damage''' |
||
| − | |rowspan="3" style="vertical-align:middle"|'''Range''' |
||
| − | |rowspan="3" style="vertical-align:middle"|'''Reload<br />speed'''<br /><sup>(sec.)</sup> |
||
| − | |rowspan="3" style="vertical-align:middle"|'''Drive-by''' |
||
| − | |rowspan="1" style="vertical-align:middle"|'''Rate of Fire''' |
||
| − | |- |
||
| − | |colspan="2" | Weapon |
||
| − | |colspan="2" | Magazine |
||
| − | |colspan="2" | ''Per round'' |
||
| − | |rowspan="2" | Standard<sub> /drive-by/</sub><br /><sub>falling/blind-firing)</sub> |
||
| − | |- |
||
| − | |<sub>Gun store</sub> |
||
| − | |<sub>Contact</sub> |
||
| − | |<sub>Gun store</sub> |
||
| − | |<sub>Contact</sub> |
||
| − | |<sub>Gun store</sub> |
||
| − | |<sub>Contact</sub> |
||
| − | |- style="background-color:#333333;" |
||
| − | |[[Baseball Bat]] |
||
| − | |2 ||$5 || -- || -- || -- || -- || -- || -- || -- || -- || -- || -- ||Y<sup>[3]</sup> || -- |
||
| − | |- style="background-color:#333333;" |
||
| − | |[[Knife]] |
||
| − | |2 || -- ||$100 || -- || -- || -- || -- || -- || -- || -- || -- || -- || -- || -- |
||
| − | |- |
||
| − | |[[Pistol]] |
||
| − | |3 ||$600 ||$420 ||$35 ||$25 ||$2.00 ||$1.67 ||17 ||1,500 ||25 || || ||Y ||180 <sub>/130/170/150-300</sub> |
||
|- |
|- |
||
| + | !Image |
||
| − | |[[Combat Pistol]] |
||
| + | !Stats |
||
| − | |3 ||$1,500 || -- ||$100 || -- ||$11.11 || -- ||9 ||1,200 ||40 || || ||Y ||180 <sub>/130/17/150-300</sub> |
||
| + | !Damage |
||
| − | |- style="background-color:#333333;" |
||
| + | !Speed |
||
| − | |[[Pump Shotgun]] |
||
| + | !Unlocked after: |
||
| − | |4 ||$1,200 ||$840 ||$100 ||$70 ||$12.50 ||$8.75 ||8 ||80 ||20<sub>/pellet</sub> || || || -- ||50 <sub>/--/__/__</sub> |
||
| + | !Cost |
||
| − | |- style="background-color:#333333;" |
||
| − | |[[Combat Shotgun]] |
||
| − | |4 ||$2,500 ||$1,500 ||$200 ||$100 ||$20.00 ||$10.00 ||10 ||80 ||10<sub>/pellet</sub> || || || -- ||140 <sub>/--/130/50</sub> |
||
|- |
|- |
||
| + | ![[File:Fist-GTA5-ingame.png|106px]]<br />Fist |
||
| − | |[[Micro-SMG]] |
||
| + | |''N/A'' |
||
| − | |5 ||$1,200 ||$840 ||$100 ||$20 ||$2.00 ||$0.40 ||50 ||1,200 ||30 || || ||Y ||650 <sub>/450/800/__</sub> |
||
| + | |Minimum |
||
| − | |- |
||
| + | |Medium |
||
| − | |[[SMG]] |
||
| + | |[[The Cousins Bellic]] |
||
| − | |5 ||$2,500 ||$1,750 ||$150 ||$20 ||$5.00 ||$0.67 ||30 ||1,200 ||30 || || ||Y ||650 <sub>/480/800/550</sub> |
||
| + | |Free |
||
| − | |- style="background-color:#333333;" |
||
| − | |[[Assault Rifle]] |
||
| − | |6 ||$3,500 ||$2,450 ||$80 ||$55 ||$2.67 ||$1.83 ||30 ||600 ||40 || || || -- ||450 <sub>/--/400/__</sub> |
||
| − | |- style="background-color:#333333;" |
||
| − | |[[Carbine Rifle]] |
||
| − | |6 ||$5,000 ||$3,500 ||$100 ||$70 ||$3.33 ||$2.33 ||30 ||600 ||30 || || ||sp.<sup>[1]</sup> ||450 <sub>/300/400/__</sub> |
||
| − | |- |
||
| − | |[[Sniper Rifle]] |
||
| − | |7 ||$6,000 || -- ||$800 || -- ||$160.00 || -- ||5 ||50 ||75 || || || -- ||48 <sub>/--/170/__</sub> |
||
| − | |- |
||
| − | |[[Combat Sniper]] |
||
| − | |7 ||$8,500 ||$5,000 ||$500 ||$500 ||$50.00 ||$50.00 ||10 ||50 ||75 || || || -- ||150 <sub>/--/140/__</sub> |
||
| − | |- style="background-color:#333333;" |
||
| − | |[[Rocket Launcher]] |
||
| − | |8 ||$15,000 || -- ||$5,000 || -- ||$5,000 || -- ||1 ||8 ||sp. || || || -- ||20 <sub>/--/30/__</sub> |
||
| − | |- |
||
| − | |[[Molotov Cocktail]] |
||
| − | |9 ||$500 ||$350 ||$500 ||$350 ||$500 ||$350 ||1 ||25 || || || ||Y ||30 <sub>/40-50/__/__</sub> |
||
| − | |- |
||
| − | |[[Grenades]] |
||
| − | |9 ||$1,000 ||$700 ||$1,000 ||$700 ||$1,000 ||$700 ||1 ||25 ||sp. || || ||Y ||30 <sub>/50/__/__</sub> |
||
| − | |- |
||
| − | !colspan="15" | |
||
| − | |- |
||
| − | !colspan="15" style="text-align:left"|[[Weapons in The Lost and Damned]] |
||
| − | |- style="background-color:#000000;" |
||
| − | |rowspan="3"| |
||
| − | |rowspan="3" style="vertical-align:middle"|'''Type''' |
||
| − | |colspan="6"|'''Cost''' |
||
| − | |rowspan="3" style="vertical-align:middle"|'''Magazine<br />size'''<br /><sup>(rounds)</sup> |
||
| − | |rowspan="3" style="vertical-align:middle"|'''Carrying<br />capacity'''<br /><sup>(rounds)</sup> |
||
| − | |rowspan="3" style="vertical-align:middle"|'''Damage''' |
||
| − | |rowspan="3" style="vertical-align:middle"|'''Range''' |
||
| − | |rowspan="3" style="vertical-align:middle"|'''Reload<br />speed'''<br /><sup>(sec.)</sup> |
||
| − | |rowspan="3" style="vertical-align:middle"|'''Drive-by''' |
||
| − | |rowspan="3" style="vertical-align:middle"|'''Rate of Fire''' (RPM)<br /><sub>(standard /drive-by/</sub><br /><sub>falling/blind-firing)</sub> |
||
| − | |- |
||
| − | |colspan="2" | Weapon |
||
| − | |colspan="2" | Magazine |
||
| − | |colspan="2" | Per round |
||
| − | |- |
||
| − | |<sub>Gun store</sub> |
||
| − | |<sub>Contact</sub> |
||
| − | |<sub>Gun store</sub> |
||
| − | |<sub>Contact</sub> |
||
| − | |<sub>Gun store</sub> |
||
| − | |<sub>Contact</sub> |
||
| − | |- style="background-color:#333333;" |
||
| − | |[[Pool Cue]] |
||
| − | |2 || -- || -- || -- || -- || -- || -- || -- || -- || -- || -- || -- || -- || -- |
||
| − | |- |
||
| − | |[[Automatic 9mm]] |
||
| − | |3 || -- ||$500 || -- ||$15 || -- ||$0.88 ||17 ||1,200 ||20 ||65 ||2 ||Y ||600 <sub>/450/170/__</sub> |
||
| − | |- style="background-color:#333333;" |
||
| − | |[[Sawn-off Shotgun]] |
||
| − | |4 || -- ||$600 || -- ||$5 || -- ||$2.50 ||2 ||160 ||35 ||30 ||1 ||Y ||75 <sub>/140/50/50</sub> |
||
| − | |- style="background-color:#333333;" |
||
| − | |[[Assault Shotgun]] |
||
| − | |4 || -- ||$3,500 || -- ||$25 || -- ||$3.13 ||8 ||250 ||25 ||35 ||2.9 || -- ||500 <sub>/300/50/60</sub> |
||
| − | |- |
||
| − | |[[Grenade Launcher]] |
||
| − | |8 || -- ||$7,000 || -- ||$700 || -- ||$700 ||1 ||20 ||sp. ||sp. ||2.1 || -- ||16 <sub>/--/30/20</sub> |
||
| − | |- style="background-color:#333333;" |
||
| − | |[[Pipe Bomb]] |
||
| − | |9 || -- ||$700 || -- ||$700 || -- ||$700 ||1 ||25 || || || ||Y ||30 <sub>/50/__/__</sub> |
||
| − | |- |
||
| − | !colspan="15" | |
||
| − | |- |
||
| − | !colspan="15" style="text-align:left"|[[Weapons in The Ballad of Gay Tony]] |
||
| − | |- style="background-color:#000000;" |
||
| − | |rowspan="3"| |
||
| − | |rowspan="3" style="vertical-align:middle"|'''Type''' |
||
| − | |colspan="6"|'''Cost''' |
||
| − | |rowspan="3" style="vertical-align:middle"|'''Magazine<br />size'''<br /><sup>(rounds)</sup> |
||
| − | |rowspan="3" style="vertical-align:middle"|'''Carrying<br />capacity'''<br /><sup>(rounds)</sup> |
||
| − | |rowspan="3" style="vertical-align:middle"|'''Damage''' |
||
| − | |rowspan="3" style="vertical-align:middle"|'''Range''' |
||
| − | |rowspan="3" style="vertical-align:middle"|'''Reload<br />speed'''<br /><sup>(sec.)</sup> |
||
| − | |rowspan="3" style="vertical-align:middle"|'''Drive-by''' |
||
| − | |rowspan="3" style="vertical-align:middle"|'''Rate of Fire''' (RPM)<br /><sub>(standard /drive-by/</sub><br /><sub>falling/blind-firing)</sub> |
||
| − | |- |
||
| − | |colspan="2" | Weapon |
||
| − | |colspan="2" | Magazine |
||
| − | |colspan="2" | Per round |
||
| − | |- |
||
| − | |<sub>Gun store</sub> |
||
| − | |<sub>Contact</sub> |
||
| − | |<sub>Gun store</sub> |
||
| − | |<sub>Contact</sub> |
||
| − | |<sub>Gun store</sub> |
||
| − | |<sub>Contact</sub> |
||
| − | |- |
||
| − | |[[Pistol .44]] |
||
| − | |3 || -- ||$640 || -- ||$50 || -- ||$6.25 ||8 ||1,500 || || || ||Y ||130 <sub>/180/170/150-300</sub> |
||
| − | |- style="background-color:#333333;" |
||
| − | |[[Automatic Shotgun]] |
||
| − | |4 || -- ||$1,250 || -- ||$80 || -- ||$4.00 ||20 ||250 || || || || -- ||120 <sub>/--/40/50</sub> |
||
| − | |- style="background-color:#333333;" |
||
| − | |[[Automatic Shotgun|Explosive Shotgun]] |
||
| − | |4 || -- ||$1,250 || -- ||$160 || -- ||$8.00 ||20 ||600 || || || || -- ||120 <sub>/--/400/50</sub> |
||
| − | |- |
||
| − | |[[Assault SMG]] |
||
| − | |5 || -- ||$6,725 || -- ||$150 || -- ||$3.00 ||50 ||1,200 || || || ||Y ||650 <sub>/300/800/550</sub> |
||
| − | |- |
||
| − | |[[Gold SMG]] |
||
| − | |5 || -- ||$5,000 || -- ||$60 || -- ||$2.00 ||30 ||1,200 || || || ||Y ||1,000 <sub>/450/800/650</sub> |
||
| − | |- style="background-color:#333333;" |
||
| − | |[[Advanced MG]] |
||
| − | |6 || -- ||$7,550 || -- ||$400 || -- ||$2.00 ||200 ||600 || || || || -- ||800 <sub>/--/400/__</sub> |
||
| − | |- |
||
| − | |[[Advanced Sniper]] |
||
| − | |7 || -- ||$4,750 || -- ||$200 || -- ||$20.00 ||10 ||50 || || || || -- ||60 <sub>/--/170/__</sub> |
||
| − | |- style="background-color:#333333;" |
||
| − | |[[Sticky Bombs]] |
||
| − | |9 || -- ||$800 || -- ||$800 || -- ||$800 ||1 ||25 || || || ||Y ||30 <sub>/75<sup[2]</sup>/__/__</sub> |
||
|} |
|} |
||
| − | [1] When drive-by shooting from a boat (by Derrick McReary in the mission [[Babysitting]] only)<br /> |
||
| − | [2] 50 RPM during the chase in the mission [[Frosting on the Cake]].<br /> |
||
| − | [3] Can be used in bike racing in The Lost and Damned. |
||
| − | ==Melee== |
||
| − | ====[[Fist]]==== |
||
| − | [[File:Fistfight.JPG|thumb|242px|Fists]] |
||
Unarmed, the player is able to dodge attacks, disarm opponents, perform ground punches and kicks, left and right hooks, and uppercuts and jabs. Moves can be strung together to create a combo. On some occasions, the player can perform "stun" hits that render the opponent unable to block momentarily and makes them more vulnerable to strikes. On rare occasions, such as in the mission [[Clean Getaway]], the player can perform a "stun" knockout hit, where if they lock on to a target and approach them without them noticing the player, the target becomes a blink red dot and the player can perform an uppercut, knocking the target out instantly. Fighting unarmed is the best way to fight someone without killing them. |
Unarmed, the player is able to dodge attacks, disarm opponents, perform ground punches and kicks, left and right hooks, and uppercuts and jabs. Moves can be strung together to create a combo. On some occasions, the player can perform "stun" hits that render the opponent unable to block momentarily and makes them more vulnerable to strikes. On rare occasions, such as in the mission [[Clean Getaway]], the player can perform a "stun" knockout hit, where if they lock on to a target and approach them without them noticing the player, the target becomes a blink red dot and the player can perform an uppercut, knocking the target out instantly. Fighting unarmed is the best way to fight someone without killing them. |
||
| − | With the |
+ | With the [[Fist]] selected as the current weapon, the player can pick up random objects off the streets such as a bricks and bottles. However, the player cannot switch weapons while an item is picked up. All items on the street that the player picks up do the same damage when thrown at someone. Objects which can be picked up and thrown will not disappear no matter how far away it is from the player. Using an example, if the player picks up an object from a rooftop and throws it down the from the balcony, the player will still find the object which he/she threw earlier on in its original condition on the ground when the player reaches street level. |
| + | |||
| + | ====Baseball Bat==== |
||
| + | {| class="wikitable" |
||
| + | |- |
||
| + | !Image |
||
| + | !Stats |
||
| + | !Damage |
||
| + | !Speed |
||
| + | !Unlocked after: |
||
| + | !Cost |
||
| + | |- |
||
| + | ![[Image:BaseballBat-GTA4.png|106px]]<br />Baseball Bat |
||
| + | |''N/A'' |
||
| + | |20 |
||
| + | |Medium |
||
| + | |[[Do You Have Protection?]] |
||
| + | |$5 |
||
| + | |} |
||
| − | ====[[Baseball Bat]]==== |
||
| − | [[Image:BaseballBat-GTA4.png|right|thumb|130px|Baseball Bat]] |
||
| − | *Cost: $5 (Gun Shop) |
||
*[[Baseball_Bat#GTA_IV|Locations]] |
*[[Baseball_Bat#GTA_IV|Locations]] |
||
| − | The [[Baseball_Bat |
+ | The [[Baseball_Bat]] can be used to block attacks with it. The bat can be useful when the player doesn't want to draw attention to themselves, since it is considered a "silent" weapon, though less so than the Knife. The bat is a superior weapon against an unprotected opponent to the Knife, as it will often knock them down in one or two blows and they cannot block them. It can also knock weapons out of opponent's hands when they are aiming in the direction of the player. |
| + | ====Knife==== |
||
| + | {| class="wikitable" |
||
| + | |- |
||
| + | !Image |
||
| + | !Stats |
||
| + | !Damage |
||
| + | !Speed |
||
| + | !Unlocked after: |
||
| + | !Cost |
||
| + | |- |
||
| + | ![[File:Knife_-_GTAIV.png|40px]]<br />Knife |
||
| + | |''N/A'' |
||
| + | |15 |
||
| + | |High |
||
| + | |The Cousins Bellic |
||
| + | |$100 (Contact) |
||
| + | |} |
||
| − | ====[[Knife]]==== |
||
| − | [[File:Knife_-_GTAIV.png|thumb|30px]] |
||
| − | *Cost: $100 (Contact) |
||
*[[Knife#Grand_Theft_Auto_IV|Locations]] |
*[[Knife#Grand_Theft_Auto_IV|Locations]] |
||
| − | [[Knife|Knives]] are very efficient alternatives to firearms. Jabs can be delivered quickly (quicker than using fist attacks) and even a well-armored adversary can be taken down with 3 to 6 slashes. They are very effective at taking someone down without getting police attention. This is helpful on the street and in missions when attracting police attention isn't the best idea. Unlike [[Grand Theft Auto: San Andreas|San Andreas]] however, the player cannot execute stealth kills with the knife. |
+ | [[Knife|Knives]] are very efficient alternatives to firearms. Jabs can be delivered quickly (quicker than using fist attacks) and even a well-armored adversary can be taken down with 3 to 6 slashes. They are very effective at taking someone down without getting police attention. This is helpful on the street and in missions when attracting police attention isn't the best idea. Unlike [[Grand Theft Auto: San Andreas|GTA San Andreas]] and [[GTA V]], however, the player cannot execute stealth kills with the knife. |
| − | == |
+ | ==Handguns== |
| − | ===Handguns=== |
||
Handguns are the most widespread firearms in the game. While not particularly powerful, they can be very effective when used properly, especially when the player aims for the head of a target. Handguns are best suited for close to medium ranges and can be used from a vehicle. They are the only weapons which can be used for a [[Executions|cinematic execution]]. |
Handguns are the most widespread firearms in the game. While not particularly powerful, they can be very effective when used properly, especially when the player aims for the head of a target. Handguns are best suited for close to medium ranges and can be used from a vehicle. They are the only weapons which can be used for a [[Executions|cinematic execution]]. |
||
| + | ===Pistol=== |
||
| − | ''Carrying capacity for handgun ammunition is 1,500 rounds.'' |
||
| + | {| class="wikitable" |
||
| + | |- |
||
| + | !Image |
||
| + | !Stats |
||
| + | !Magazine Size |
||
| + | !Measured Fire Rate (Standard) |
||
| + | !Measured Fire Rate ([[Drive-By Shooting|drive-by shooting]]) |
||
| + | !Measured Fire Rate (When falling or being burned) |
||
| + | !Measured Fire Rate (When blind firing from [[Cover System|cover]]) |
||
| + | !Unlocked after: |
||
| + | !Cost |
||
| + | |- |
||
| + | ![[File:Pistol-GTA4.png|106px]]<br />Pistol |
||
| + | |Damage: 2.6/10.0<br />Fire Rate: 4.0/10.0<br />Accuracy: 4.0/10.0<br />Range: 2.5/10.0 |
||
| + | |17 |
||
| + | |180 |
||
| + | |130 |
||
| + | |170 |
||
| + | |150-300 |
||
| + | |Do You Have Protection? |
||
| + | |$600 (Gun Shop<br />$420 (Contact) |
||
| + | |} |
||
| − | ====[[Pistol]] (Glock 22 Gen 1)==== |
||
| − | [[File:Pistol-GTA4.png|thumb|130px|Glock 22 Gen 1 Pistol]] |
||
| − | *Cost (Gun Shop): $600 + $35 for each additional magazine |
||
| − | *Cost (Contact): $420 + $25 for each additional magazine |
||
| − | *Magazine size: 17 rounds |
||
| − | *Damage: 25 |
||
| − | *Rate of fire: |
||
| − | **Standard: '''180''' RPM |
||
| − | **When Drive-By shooting ''from a motorcycle'': 130 RPM |
||
| − | **When falling or being burned: 170 RPM |
||
| − | **When blind firing from [[Cover System|cover]]: ''Varies between'' 150-300 RPM, ''depending on the player's stance'' |
||
*[[Pistol#Grand_Theft_Auto_IV|Locations]] |
*[[Pistol#Grand_Theft_Auto_IV|Locations]] |
||
| − | |||
It is the standard pistol, eponymous with the [[Police]] and much of the game's opponents early in the story. It has a decent range when shooting, and takes about 4 to 6 body shots to kill or mortally wound an unarmored opponent. Even though its 17-round magazine capacity is consistent with the 9x19mm Glock 17, a close look at the gun reveals that "22" is written on the slide, confirming that it is a .40 S&W Glock 22, which has a 15-round magazine. |
It is the standard pistol, eponymous with the [[Police]] and much of the game's opponents early in the story. It has a decent range when shooting, and takes about 4 to 6 body shots to kill or mortally wound an unarmored opponent. Even though its 17-round magazine capacity is consistent with the 9x19mm Glock 17, a close look at the gun reveals that "22" is written on the slide, confirming that it is a .40 S&W Glock 22, which has a 15-round magazine. |
||
| + | ===Combat Pistol=== |
||
| + | {| class="wikitable" |
||
| + | |- |
||
| + | !Image |
||
| + | !Stats |
||
| + | !Magazine Size |
||
| + | !Measured Fire Rate (Standard) |
||
| + | !Measured Fire Rate ([[Drive-By Shooting|drive-by shooting]]) |
||
| + | !Measured Fire Rate (When falling or being burned) |
||
| + | !Measured Fire Rate (When blind firing from [[Cover System|cover]]) |
||
| + | !Unlocked after: |
||
| + | !Cost |
||
| + | |- |
||
| + | ![[Image:CombatPistol-GTA4.png|106px]]<br />Combat Pistol |
||
| + | |Damage: 2.7/10.0<br />Fire Rate: 4.0/10.0<br />Accuracy: 5.0/10.0<br />Range: 3.0/10.0 |
||
| + | |9 |
||
| + | |180 |
||
| + | |130 |
||
| + | |170 |
||
| + | |150-300 |
||
| + | |[[Museum Piece]] |
||
| + | |$1,500 |
||
| + | |} |
||
| − | |||
| − | ====[[Combat Pistol]] (Desert Eagle Mark XIX)==== |
||
| − | [[Image:CombatPistol-GTA4.png|thumb|128px|Desert Eagle]] |
||
| − | *Cost (Gun Shop): $1,500 + $100 for each additional magazine |
||
| − | *Magazine size: 9 rounds |
||
| − | *Damage: 40 |
||
| − | *Rate of fire: |
||
| − | **Standard: '''180''' RPM |
||
| − | **When Drive-By shooting ''from a motorcycle'': 130 RPM |
||
| − | **When falling or being burned: 170 RPM |
||
| − | **When blind firing from [[Cover System|cover]]: ''Varies between'' 150-300 RPM, ''depending on the player's stance'' |
||
*[[Desert_Eagle#Grand_Theft_Auto_IV|Locations]] |
*[[Desert_Eagle#Grand_Theft_Auto_IV|Locations]] |
||
The Combat Pistol is much more powerful than the standard pistol, with a higher range, accuracy and damage overall. Its 9-round capacity suggests it is based on the .357 Magnum variant of the Desert Eagle. |
The Combat Pistol is much more powerful than the standard pistol, with a higher range, accuracy and damage overall. Its 9-round capacity suggests it is based on the .357 Magnum variant of the Desert Eagle. |
||
| + | ==Sub-Machine Guns== |
||
| − | ===Shotguns=== |
||
| + | Sub-machine guns are the next step up from shotguns and pistols. They're most effective at close-to-medium range while running and gunning at targets to quickly cycle through them, but are ineffective at long distances unless carefully aimed. The player should fire in bursts when engaging mid-range targets and only fire in full auto when confronted up-close. These are preferred over pistols when doing drive-bys or chasing down an escaping car and are the strongest weapons that can be used while doing so, unless the situation allows Hand Grenades to be employed. |
||
| − | Shotguns are somewhere between Pistols and SMGs. They are extremely powerful at close range and''' '''are often one-to-two hit kills. They deal far more damage per shot than pistols and SMGs, but fire more slowly to compensate, so they aren't ideal when fighting a large group of enemies while running-and-gunning out in the open. They are best used while using cover for laying down a small number of enemies during close combat and in surprise attacks. |
||
| + | ===Micro SMG=== |
||
| − | ''Carrying capacity for shotgun ammunition is 80 shells.'' |
||
| + | {| class="wikitable" |
||
| − | ====[[Pump Shotgun]] (Auto Hardball Model 870 Airsoft)==== |
||
| + | |- |
||
| − | [[File:PumpActionShotgun-GTA4.png|thumb|130px|Pump Shotgun (Auto Hardball Model 870 Airsoft)]] |
||
| + | !Image |
||
| − | *Cost (Gun Shop): $1,200 + $100 for 8 shells |
||
| + | !Stats |
||
| − | *Cost (Contact): $840 + $70 for 8 shells |
||
| − | + | !Magazine Size |
|
| + | !Measured Fire Rate (Standard) |
||
| − | *Damage: 20 per pellet |
||
| + | !Measured Fire Rate ([[Drive-By Shooting|drive-by shooting]]) |
||
| − | *Rate Of Fire: 50 RPM |
||
| + | !Measured Fire Rate (When falling or being burned) |
||
| − | *[[Pump_Shotgun#Grand_Theft_Auto_IV|Locations]] |
||
| + | !Measured Fire Rate (When blind firing from [[Cover System|cover]]) |
||
| − | The pump shotgun appears as a [[wp:Remington_Model_870|Remington Model 870]] though it gets its design of the "Auto Hardball Model 870 Airsoft" version. It used by some police officers and [[NOOSE]] units, the Pump Shotgun is a deadly force in both the player's hands and in the hands of opponents. In close quarter engagements, it is capable of killing or depleting armor in one shot, but suffers at medium-to-long range to due the high pellet spread. |
||
| + | !Unlocked after: |
||
| + | !Cost |
||
| + | |- |
||
| + | ![[Image:MicroUzi-GTA4.png|106px]]<br />Micro SMG |
||
| + | |Damage: 2.1/10.0<br />Fire Rate: 6.0/10.0<br />Accuracy: 3.0/10.0<br />Range: 2.5/10.0 |
||
| + | |50 |
||
| + | |650 |
||
| + | |450 |
||
| + | |800 |
||
| + | |550 |
||
| + | |Do You Have Protection? |
||
| + | |$1,200 (Gun Shop)<br />$840 (Contact) |
||
| + | |} |
||
| + | *[[Micro_Uzi#Grand_Theft_Auto_IV|Locations]] |
||
| − | ====[[Combat Shotgun]] (Remington 1100 Tac 4)==== |
||
| + | The [[Micro-SMG]] has a high magazine capacity and rate of fire, making it ideal for close quarter engagements, spraying and praying, and drive-bys. By aiming at certain body parts, the Mirco-SMG's spray can be focused to raise its effectiveness. |
||
| − | [[File:CombatShotgun-GTA4.png|thumb|130px|Combat Shotgun (Remington 1100 Tac 4)]] |
||
| − | *Cost (Gun Shop): $2,500 + $200 for 10 shells |
||
| − | *Cost (Contact): $1,500 + $100 for 10 shells |
||
| − | *Magazine Size: 10 shells |
||
| − | *Damage: 10 per pellet |
||
| − | *Rate Of Fire: |
||
| − | **Standard: '''140''' RPM |
||
| − | **When falling or being burned: 130 RPM |
||
| − | **When blind firing from cover: 50 RPM |
||
| − | *[[SPAS_12#Grand_Theft_Auto_IV|Locations]] |
||
| − | This semi-automatic shotgun is a powerful tool for disposing of enemies quickly and efficiently. It should be taken into account that it burns through ammo quickly and is overall not as powerful as the Pump Shotgun, but has a far greater range. It can be obtained when the player enters a [[Police Cruiser]], however law enforcement are never seen using this weapon, opting to use the Pump Shotgun instead. |
||
| + | ===SMG=== |
||
| − | In [[The Lost and Damned]], the Combat Shotgun is supplanted with a carbine model, which bares a pistol grip and a retractable stock very similar to that of the Carbine Rifle; it also has an RIS on top of the receiver. All of its statistical attributes remain the same however. |
||
| + | {| class="wikitable" |
||
| + | |- |
||
| + | !Image |
||
| + | !Stats |
||
| + | !Magazine Size |
||
| + | !Measured Fire Rate (Standard) |
||
| + | !Measured Fire Rate ([[Drive-By Shooting|drive-by shooting]]) |
||
| + | !Measured Fire Rate (When falling or being burned) |
||
| + | !Measured Fire Rate (When blind firing from [[Cover System|cover]]) |
||
| + | !Unlocked after: |
||
| + | !Cost |
||
| + | |- |
||
| + | ![[Image:MP5-GTA4.png|106px]]<br />SMG |
||
| + | |Damage: 2.2/10.0<br />Fire Rate: 5.5/10.0<br />Accuracy: 4.0/10.0<br />Range: 3.5/10.0 |
||
| + | |30 |
||
| + | |650 |
||
| + | |450 |
||
| + | |800 |
||
| + | |550 |
||
| + | |[[Luck of the Irish]] |
||
| + | |$2,500 (Gun Shop)<br />$1,750 (Contact) |
||
| + | |} |
||
| + | *[[MP10#Locations|Locations]] |
||
| − | Due to its presence in previous games and its appearance in a piece of GTA IV concept art, it was widely thought before the game's release that the Franchi SPAS-12 was to be in the game, but the developers evidently opted for the Remington 1100 Tac 4 instead. |
||
| + | [[NOOSE]] units and [[Federal Bureau of Investigation#Grand Theft Auto IV|FIB]] agents use the [[MP5|SMG]] from their vehicles at 5 and 6 [[Wanted Level in GTA IV|Wanted Stars]] when they attempt to stop the player. It has a lower magazine capacity and rate of fire than the Micro-SMG, but is more powerful and accurate with a higher range. Head and body shots are particularly effective. |
||
| + | The MP5A3 was originally featured as seen in an early BETA screenshot, but for some reason it was replaced with the MP-10. It was likely because realistically the MP5 would be too big to be operable as a drive-by weapon, a key feature of SMGs in the series. |
||
| − | ===SMGs=== |
||
| − | Sub-machine guns are the next step up from shotguns and pistols. They're most effective at close-to-medium range while running and gunning at targets to quickly cycle through them, but are ineffective at long distances unless carefully aimed. The player should fire in bursts when engaging mid-range targets and only fire in full auto when confronted up-close. These are preferred over pistols when doing drive-bys or chasing down an escaping car and are the strongest weapons that can be used while doing so, unless the situation allows Hand Grenades to be employed. |
||
| + | ==Shotguns== |
||
| − | ''Carrying capacity for sub-machine gun ammunition is 1,200 rounds.'' |
||
| + | Shotguns are somewhere between Pistols and SMGs. They are extremely powerful at close range and are often one-to-two hit kills. They deal far more damage per shot than pistols and SMGs, but fire more slowly to compensate, so they aren't ideal when fighting a large group of enemies while running-and-gunning out in the open. They are best used while using cover for laying down a small number of enemies during close combat and in surprise attacks. |
||
| − | === |
+ | ===Pump Shotgun=== |
| + | {| class="wikitable" |
||
| − | [[Image:MicroUzi-GTA4.png|right|thumb|130px|Micro-SMG (Micro-[[Uzi]])]] |
||
| + | |- |
||
| − | *Cost (Gun Shop): $1,200 + $100 for each additional magazine |
||
| + | !Image |
||
| − | *Cost (Contact): $840 + $20 for each additional magazine |
||
| + | !Stats |
||
| − | *Magazine Size: 50 rounds |
||
| + | !Magazine Size |
||
| − | *Damage: 30 |
||
| + | !Measured Fire Rate (Standard) |
||
| − | *Rate Of Fire: |
||
| + | !Measured Fire Rate ([[Drive-By Shooting|drive-by shooting]]) |
||
| − | **Standard: '''650''' RPM |
||
| + | !Measured Fire Rate (When falling or being burned) |
||
| − | **When Drive-By shooting: 450 RPM |
||
| + | !Measured Fire Rate (When blind firing from [[Cover System|cover]]) |
||
| − | **When falling or being burned: 800 RPM |
||
| + | !Unlocked after: |
||
| − | *[[Micro_Uzi#Grand_Theft_Auto_IV|Locations]] |
||
| + | !Cost |
||
| + | |- |
||
| + | ![[File:PumpActionShotgun-GTA4.png|106px]]<br />Pump Shotgun |
||
| + | |Damage: 6.7/10.0<br />Fire Rate: 2.0/10.0<br />Accuracy: 3.0/10.0<br />Range: 2.0/10.0 |
||
| + | |8 |
||
| + | |50 |
||
| + | |''N/A'' |
||
| + | |80 |
||
| + | |60 |
||
| + | |Do You Have Protection? |
||
| + | |$1,200 (Gun Shop)<br />$840 (Contact) |
||
| + | |} |
||
| + | *[[Pump_Shotgun#Grand_Theft_Auto_IV|Locations]] |
||
| − | The Micro-SMG has a high magazine capacity and rate of fire, making it ideal for close quarter engagements, spraying and praying, and drive-bys. By aiming at certain body parts, the Mirco-SMG's spray can be focused to raise its effectiveness. |
||
| + | The [[Pump shotgun]] appears as a [[wp:Remington_Model_870|Remington Model 870]] though it gets its design of the "Auto Hardball Model 870 Airsoft" version. It used by some police officers and [[NOOSE]] units, the Pump Shotgun is a deadly force in both the player's hands and in the hands of opponents. In close quarter engagements, it is capable of killing or depleting armor in one shot, but suffers at medium-to-long range to due the high pellet spread. |
||
| − | === |
+ | ===Combat Shotgun=== |
| + | {| class="wikitable" |
||
| − | [[Image:MP5-GTA4.png|right|thumb|130px|SMG (SW MP-10)]] |
||
| + | |- |
||
| − | *Cost (Gun Shop): $2,500 + $150 for each additional magazine |
||
| + | !Image |
||
| − | *Cost (Contact): $1,750 + $20 for each additional magazine |
||
| + | !Stats |
||
| − | *Magazine Size: 30 rounds |
||
| + | !Magazine Size |
||
| − | *Damage: 30 |
||
| + | !Measured Fire Rate (Standard) |
||
| − | *Rate Of Fire: |
||
| + | !Measured Fire Rate ([[Drive-By Shooting|drive-by shooting]]) |
||
| − | **Standard: '''650''' RPM |
||
| + | !Measured Fire Rate (When falling or being burned) |
||
| − | **When Drive-By shooting: 450 RPM |
||
| + | !Measured Fire Rate (When blind firing from [[Cover System|cover]]) |
||
| − | **When falling or being burned: 800 RPM |
||
| + | !Unlocked after: |
||
| − | **When blind firing from cover: 550 RPM |
||
| + | !Cost |
||
| − | *[[MP10#Locations|Locations]] |
||
| + | |- |
||
| − | [[NOOSE]] units and [[Federal Bureau of Investigation#Grand Theft Auto IV|FIB]] agents use the SMG from their vehicles at 5 and 6 [[Wanted Level in GTA IV|Wanted Stars]] when they attempt to stop the player. It has a lower magazine capacity and rate of fire than the Micro-SMG, but is more powerful and accurate with a higher range. Head and body shots are particularly effective. |
||
| + | ![[File:CombatShotgun-GTA4.png|106px]]<br />Combat Shotgun |
||
| + | |Damage: 9.6/10.0<br />Fire Rate: 2.0/10.0<br />Accuracy: 2.0/10.0<br />Range: 1.5/10. |
||
| + | |10 |
||
| + | |140 |
||
| + | |''N/A'' |
||
| + | |130 |
||
| + | |50 |
||
| + | |[[Blow Your Cover]] |
||
| + | |$2,500 (Gun Shop)<br />$1,500 (Contact) |
||
| + | |} |
||
| + | *[[SPAS_12#Grand_Theft_Auto_IV|Locations]] |
||
| − | The MP5NA3 was originally featured as seen in an early BETA screenshot, but for some reason it was replaced with the MP-10. It was likely because realistically the MP5 would be too big to be operable as a drive-by weapon, a key feature of SMGs in the series. |
||
| + | The [[Combat Shotgun]] is a powerful tool for disposing of enemies quickly and efficiently. It should be taken into account that it burns through ammo quickly and is overall not as powerful as the Pump Shotgun, but has a far greater range. It can be obtained when the player enters a [[Police Cruiser]], however law enforcement are never seen using this weapon, opting to use the Pump Shotgun instead. |
||
| + | Due to its presence in previous games and its appearance in a piece of GTA IV concept art, it was widely thought before the game's release that the Franchi SPAS-12 was to be in the game, but the developers evidently opted for the Remington 1100 Tac 4 instead. |
||
| − | ===Assault Rifles=== |
||
| + | |||
| + | ==Assault Rifles== |
||
The iconic assault rifles fill the niche between sniper rifles and SMGs. While they are more powerful and accurate than SMGs, assault rifles are also more expensive and cannot be fired while operating a vehicle. They can however be fired from any of the three passenger seats of a helicopter or boat. Assault rifles are most effective when fired in bursts at medium to long ranges. |
The iconic assault rifles fill the niche between sniper rifles and SMGs. While they are more powerful and accurate than SMGs, assault rifles are also more expensive and cannot be fired while operating a vehicle. They can however be fired from any of the three passenger seats of a helicopter or boat. Assault rifles are most effective when fired in bursts at medium to long ranges. |
||
| + | ===Assault Rifle=== |
||
| − | ''Carrying capacity for assault rifle ammunition is 600 rounds.'' |
||
| + | {| class="wikitable" |
||
| − | ====[[Assault Rifle]] (AK-47)==== |
||
| + | |- |
||
| − | [[File:AK-47-GTA4.png|thumb|130px|Assault Rifle (AK-47)]] |
||
| + | !Image |
||
| − | *Cost (Gun Shop): $3,500 + $80 for each additional magazine |
||
| + | !Stats |
||
| − | *Cost (Contact): $2,450 + $55 for each additional magazine |
||
| − | + | !Magazine Size |
|
| + | !Measured Fire Rate (Standard) |
||
| − | *Damage: 40 |
||
| + | !Measured Fire Rate ([[Drive-By Shooting|drive-by shooting]]) |
||
| − | *Rate Of Fire: |
||
| + | !Measured Fire Rate (When falling or being burned) |
||
| − | **Standard: '''450''' RPM |
||
| + | !Measured Fire Rate (When blind firing from [[Cover System|cover]]) |
||
| − | **When falling or being burned: 400 RPM |
||
| + | !Unlocked after: |
||
| + | !Cost |
||
| + | |- |
||
| + | ![[File:AK-47-GTA4.png|106px]]<br />Assault Rifle |
||
| + | |Damage: 3.0/10.0<br />Fire Rate: 6.0/10.0<br />Accuracy: 4.5/10.0<br />Range: 4.5/10.0 |
||
| + | |30 |
||
| + | |450 |
||
| + | |''N/A'' |
||
| + | |400 |
||
| + | |600 |
||
| + | |[[Deconstruction for Beginners]] |
||
| + | |$3,500 (Gun Shop)<br />$2,450 (Contact) |
||
| + | |} |
||
| + | |||
*[[AK-47#Grand_Theft_Auto_IV|Locations]] |
*[[AK-47#Grand_Theft_Auto_IV|Locations]] |
||
| − | The Assault Rifle has high power, accuracy and range, making it ideal for use in many missions and situations. When the Carbine Rifle is unlocked however, it is overshadowed. |
+ | The [[AK-47|Assault Rifle]] has high power, accuracy and range, making it ideal for use in many missions and situations. When the Carbine Rifle is unlocked however, it is overshadowed. |
| + | |||
| + | ===Carbine Rifle=== |
||
| + | {| class="wikitable" |
||
| + | |- |
||
| + | !Image |
||
| + | !Stats |
||
| + | !Magazine Size |
||
| + | !Measured Fire Rate (Standard) |
||
| + | !Measured Fire Rate ([[Drive-By Shooting|drive-by shooting]]) |
||
| + | !Measured Fire Rate (When falling or being burned) |
||
| + | !Measured Fire Rate (When blind firing from [[Cover System|cover]]) |
||
| + | !Unlocked after: |
||
| + | !Cost |
||
| + | |- |
||
| + | ![[Image:CarbineRifle-GTA4.png|106px]]<br />Carbine Rifle |
||
| + | |Damage: 3.2/10.0<br />Fire Rate: 6.5/10.0<br />Accuracy: 5.5/10.0<br />Range: 4.5/10.0 |
||
| + | |30 |
||
| + | |450 |
||
| + | |''N/A'' |
||
| + | |400 |
||
| + | |600 |
||
| + | |[[Three Leaf Clover]] |
||
| + | |$5,000 (Gun Shop)<br />$3,500 (Contact) |
||
| + | |} |
||
| − | ====[[Carbine Rifle]] (M4A1)==== |
||
| − | [[Image:CarbineRifle-GTA4.png|right|thumb|130px|Carbine Rifle (M4A1)]] |
||
| − | *Cost (Gun Shop): $5,000 + $100 for each additional magazine |
||
| − | *Cost (Contact): $3,500 + $70 for each additional magazine |
||
| − | *Magazine Size: 30 rounds |
||
| − | *Damage: 30 |
||
| − | *Rate Of Fire: |
||
| − | **Standard: '''450''' RPM |
||
| − | **When drive-by shooting from a boat (by [[Derrick McReary]] in [[Babysitting]] only): 300 RPM |
||
| − | **When falling or being burned : 400 RPM |
||
*[[AR-15#Grand_Theft_Auto_IV|Locations]] |
*[[AR-15#Grand_Theft_Auto_IV|Locations]] |
||
| − | Early in the game before it is unlocked, the Carbine Rifle can be acquired from NOOSE units as well as certain [[ |
+ | Early in the game before it is unlocked, the [[Carbine Rifle]] can be acquired from [[NOOSE]] units as well as certain [[Liberty City Police Department (HD Universe)|LCPD]] Officers, specifically those who guard places of high security level like [[Subway in GTA IV|subway stations]] and landmark areas. [[FIB]] agents will also use it against the player. It is much more powerful and accurate than the Assault Rifle, but less common. On the bottom of the magazine there's a joke that says "STOP CHILLIN START KILLIN". |
| − | + | ==Sniper Rifles== |
|
Sniper Rifles are unmatched in precision long range shooting, far more accurate and powerful than Assault Rifles. They do however have low fire rates and small magazine capacities, and therefore should be quickly switched out for a more suitable weapon when confronted up close. Sniper Rifles are good getting the jump on enemies by picking them off from a safe distance, and for providing far-away sniper support for friends in a heated gun battle. |
Sniper Rifles are unmatched in precision long range shooting, far more accurate and powerful than Assault Rifles. They do however have low fire rates and small magazine capacities, and therefore should be quickly switched out for a more suitable weapon when confronted up close. Sniper Rifles are good getting the jump on enemies by picking them off from a safe distance, and for providing far-away sniper support for friends in a heated gun battle. |
||
| + | ===Sniper Rifle=== |
||
| − | ''Carrying capacity for Sniper Rifle ammunition is 50 rounds.'' |
||
| + | {| class="wikitable" |
||
| − | ====[[Sniper Rifle]] (Remington 700)==== |
||
| + | |- |
||
| − | [[Image:SniperRifle-GTA4.png|right|thumb|130px|Sniper Rifle (Remington 700)]] |
||
| + | !Image |
||
| − | *Cost (Gun Shop): $6,000 + $800 for each additional magazine |
||
| + | !Stats |
||
| − | *Magazine Size: 5 rounds |
||
| + | !Magazine Size |
||
| − | *Damage: 75 |
||
| + | !Measured Fire Rate (Standard) |
||
| − | *Rate Of Fire: |
||
| + | !Measured Fire Rate ([[Drive-By Shooting|drive-by shooting]]) |
||
| − | **Standard: '''48''' RPM |
||
| − | + | !Measured Fire Rate (When falling or being burned) |
|
| + | !Measured Fire Rate (When blind firing from [[Cover System|cover]]) |
||
| + | !Unlocked after: |
||
| + | !Cost |
||
| + | |- |
||
| + | ![[Image:SniperRifle-GTA4.png|106px]]<br />Sniper Rifle |
||
| + | |Damage: 9.6/10.0<br />Fire Rate: 2.5/10.0<br />Accuracy: 7.0/10.0<br />Range: 9.5/10.0 |
||
| + | |5 |
||
| + | |48 |
||
| + | |''N/A'' |
||
| + | |170 |
||
| + | |150 |
||
| + | |Luck of the Irish |
||
| + | |$6,000 |
||
| + | |} |
||
| + | |||
*[[Sniper_Rifle#GTA_IV|Locations]] |
*[[Sniper_Rifle#GTA_IV|Locations]] |
||
| − | + | The [[Sniper Rifle]] uses a bolt-action mechanism, making it relatively slow-firing, but also extremely accurate and powerful, killing most armored enemies with one shot to the torso or groin. Based on the Remington 700, it oddly has an external box magazine not seen on the real weapon, likely an aftermarket modification. |
|
| + | |||
| + | ===Combat Sniper=== |
||
| + | {| class="wikitable" |
||
| + | |- |
||
| + | !Image |
||
| + | !Stats |
||
| + | !Magazine Size |
||
| + | !Measured Fire Rate (Standard) |
||
| + | !Measured Fire Rate ([[Drive-By Shooting|drive-by shooting]]) |
||
| + | !Measured Fire Rate (When falling or being burned) |
||
| + | !Measured Fire Rate (When blind firing from [[Cover System|cover]]) |
||
| + | !Unlocked after: |
||
| + | !Cost |
||
| + | |- |
||
| + | ![[File:CombatRifle-GTA4.png|106px]]<br />Combat Sniper |
||
| + | |Damage: 9.9/10.0<br />Fire Rate: 2.0/10.0<br />Accuracy: 9.0/10.0<br />Range: 10.0/10.0 |
||
| + | |10 |
||
| + | |150 |
||
| + | |''N/A'' |
||
| + | |140 |
||
| + | |120 |
||
| + | |Deconstruction for Beginners |
||
| + | |$8,500 (Gun Shop)<br />$5,000 (Contact) |
||
| + | |} |
||
| − | ====[[Combat Sniper]] (H&K PSG1-A1)==== |
||
| − | [[File:CombatRifle-GTA4.png|thumb|Combat Sniper (H&K PSG1-A1)]] |
||
| − | *Cost (Gun Shop) : $8,500 + $500 for each additional magazine |
||
| − | *Cost (Contact) : $5,000 + $500 for each additional magazine |
||
| − | *Magazine Size : 10 rounds |
||
| − | *Damage : 75 |
||
| − | *Rate Of Fire : |
||
| − | **Standard : '''150''' RPM |
||
| − | **When falling or being burned : 140 RPM |
||
*[[PSG-1#Grand_Theft_Auto_IV|Locations]] |
*[[PSG-1#Grand_Theft_Auto_IV|Locations]] |
||
| − | The Combat Sniper is semi-automatic, allowing for a deliverence of more rounds on a target than the Sniper Rifle, however it is not as powerful. This weapon is very rarely seen in-game in the hands of NPCs. |
+ | The [[Combat Sniper]] is semi-automatic, allowing for a deliverence of more rounds on a target than the Sniper Rifle, however it is not as powerful. This weapon is very rarely seen in-game in the hands of NPCs. |
| + | |||
| + | ==Heavy Weapons== |
||
| + | ===RPG=== |
||
| + | {| class="wikitable" |
||
| + | |- |
||
| + | !Image |
||
| + | !Stats |
||
| + | !Magazine Size |
||
| + | !Measured Fire Rate (Standard) |
||
| + | !Measured Fire Rate ([[Drive-By Shooting|drive-by shooting]]) |
||
| + | !Measured Fire Rate (When falling or being burned) |
||
| + | !Measured Fire Rate (When blind firing from [[Cover System|cover]]) |
||
| + | !Unlocked after: |
||
| + | !Cost |
||
| + | |- |
||
| + | ![[File:Rl_4.png|106px]]<br />RPG |
||
| + | |Damage: 10.0/10.0<br />Fire Rate: 0.5/10.0<br />Accuracy: 1.0/10.0<br />Range: 7.0/10.0 |
||
| + | |1 |
||
| + | |20 |
||
| + | |''N/A'' |
||
| + | |30 |
||
| + | |15 |
||
| + | |Deconstruction for Beginners |
||
| + | |$15,000 (Gun Shop)<br />$10,000 (Contact) |
||
| + | |} |
||
| − | ==Launchers== |
||
| − | ====[[RPG]] (RPG-7)==== |
||
| − | [[File:Rl_4.png|thumb|RPG-7]] |
||
| − | *Cost (gun shop): $15,000 + $5,000 for each additional rocket |
||
| − | *Cost (contact): $10,000 + $3,500 for each additional rocket |
||
| − | *Magazine Size: 1 rocket |
||
| − | *Carrying Capacity: 8 rockets (7 + 1) |
||
| − | *Rate of Fire: |
||
| − | **Standard: '''20''' RPM |
||
| − | **When falling or being burned: 30 RPM |
||
*[[Rocket_Launcher#GTA_IV|Locations]] |
*[[Rocket_Launcher#GTA_IV|Locations]] |
||
| − | The |
+ | The [[Rocket Launcher]] can be blind-fired while in cover and is a largely devastating weapon, destroying all vehicles in the game, bar the [[NOOSE APC]], in one direct hit. Its high splash damage will likely destroy or maime other vehicles in the vicinity. The weapon is aimed from an over-the-shoulder perspective, allowing the player to move while aiming, unlike in the GTA III era where the player was forced into a stationary first-person perspective. Also unlike the GTA III era, the player does not need a direct hit on the fuselage of a helicopter to take it down as the force of the detonating rocket can cause a helicopter pilot to lose control and crash. It is, by far, one of the deadliest weapons in the game, however, misuse of the RPG can result in the player's own death. |
| − | ==Thrown |
+ | ==Thrown== |
| − | Thrown weapons are useful when engaging groups of enemies. They are more versatile in GTA IV are more than they were in the [[ |
+ | Thrown weapons are useful when engaging groups of enemies. They are more versatile in GTA IV are more than they were in the [[3D Universe]]; they can be thrown forwards with precision aim, dropped by pressing the fire button without holding the aim button, or thrown from vehicles. Carelessness with thrown weapons, such as overcooking a grenade or walking into flames caused by a Molotov, can result in the player's death. |
| + | ===Molotov Cocktail=== |
||
| − | ''Carrying capacity for thrown weapons is 25 units.'' |
||
| + | {| class="wikitable" |
||
| + | |- |
||
| + | !Image |
||
| + | !Stats |
||
| + | !Unlocked after: |
||
| + | !Cost |
||
| + | |- |
||
| + | ![[Image:MolotovCocktail-GTA4.png|106px]]<br />Molotov Cocktail |
||
| + | |Damage: 5.0/10.0<br />Fire Rate: 2.0/10.0<br />Accuracy: 2.0/10.0<br />Range: 0.8/10.0 |
||
| + | |Do You Have Protection? |
||
| + | |$500 (Gun Shop)<br />$350 (Contact) |
||
| + | |} |
||
| − | ===[[Molotov Cocktail]]=== |
||
| − | [[Image:MolotovCocktail-GTA4.png|right|thumb|130px|The Molotov Cocktail.]] |
||
| − | *Cost (Gun Shop): $500 per unit |
||
| − | *Cost (Contact): $350 per unit |
||
| − | *Rate of fire: |
||
| − | **Standard: '''30''' RPM |
||
| − | **When [[Drive-By Shooting]]: 40 RPM ''from a [[car]]'', 50 RPM ''from a [[motorcycle]]'' |
||
*[[Molotov_Cocktail#GTA_IV|Locations]] |
*[[Molotov_Cocktail#GTA_IV|Locations]] |
||
| − | The Molotov Cocktail, named after 1920s Soviet politician Vyacheslav Molotov, is a crude but effective weapon that creates a large burst of flames on the target. The player can toss Molotov's behind themselves to fend off pursuers or use it to set vehicles on fire, weeding opponents out of cover. Any target caught in flames is defenseless and offenseless while burning, allowing the player to finish off the target easily or focus on others. |
+ | The [[Molotov Cocktail]], named after 1920s Soviet politician Vyacheslav Molotov, is a crude but effective weapon that creates a large burst of flames on the target. The player can toss Molotov's behind themselves to fend off pursuers or use it to set vehicles on fire, weeding opponents out of cover. Any target caught in flames is defenseless and offenseless while burning, allowing the player to finish off the target easily or focus on others. |
The player must be careful not to get burned as exposure to the fire loses a large portion of health or armor and Niko will be left thrashing on the ground until he puts himself out, vulnerable to further attack the entire time. |
The player must be careful not to get burned as exposure to the fire loses a large portion of health or armor and Niko will be left thrashing on the ground until he puts himself out, vulnerable to further attack the entire time. |
||
| − | === |
+ | ===Grenade=== |
| + | {| class="wikitable" |
||
| − | [[Image:Grenade-GTA4.png|right|thumb|130px|The Grenade.]] |
||
| + | |- |
||
| − | *Cost (Gun Shop): $1,000 per unit |
||
| + | !Image |
||
| − | *Cost (Contact): $700 per unit |
||
| + | !Stats |
||
| − | *Rate of fire: |
||
| + | !Unlocked after: |
||
| − | **Standard: '''30''' RPM |
||
| + | !Cost |
||
| − | **When Drive-By shooting: 50 RPM |
||
| + | |- |
||
| + | ![[Image:Grenade-GTA4.png|106px]] |
||
| + | |Damage: 9.5/10.0<br />Fire Rate: 2.0/10.0<br />Accuracy: 1.0/10.0<br />Range: 1.5/10.0 |
||
| + | |Deconstruction for Beginners |
||
| + | |$1,000 (Gun Shop)<br />$700 (Contact) |
||
| + | |} |
||
| + | |||
*[[Grenade#GTA_IV|Locations]] |
*[[Grenade#GTA_IV|Locations]] |
||
| − | The |
+ | The [[Grenade]] is excellent at clearing rooms full of enemies and taking out vehicles. They can be tossed underhanded, thrown overhanded, or dropped from behind while running. The player can shorten the detonation timer by cooking a grenade, which is done by holding the fire button. When cooking a grenade, it begins beeping if held for too long. The grenade is an effective drive-by weapon, as a well timed grenade can disable or destroy a pursuing vehicle, but the player must be careful not to catch their own vehicle in the explosion. |
==BETA Weapons== |
==BETA Weapons== |
||
| Line 409: | Line 441: | ||
*[[MP5]] |
*[[MP5]] |
||
The MP5 was seen in a pre-release screenshot for GTA IV with a 15-round magazine |
The MP5 was seen in a pre-release screenshot for GTA IV with a 15-round magazine |
||
| − | |||
*[[M16|M16A2]] |
*[[M16|M16A2]] |
||
In game art for the game, a NOOSE Tactical Response Unit officer is seen using an M16A1. Mods allow for the Carbine to be replaced with this weapon; in this case, with an added scope [http://www.youtube.com/watch?v=3XGaMLyiBDo]. |
In game art for the game, a NOOSE Tactical Response Unit officer is seen using an M16A1. Mods allow for the Carbine to be replaced with this weapon; in this case, with an added scope [http://www.youtube.com/watch?v=3XGaMLyiBDo]. |
||
| − | |||
*[[Python]] |
*[[Python]] |
||
The [[Python]] was going to be featured and was shown in a screenshot before GTA IV was released. A similar weapon is featured in [[The Ballad of Gay Tony]] DLC, but modeled after a semi-automatic [[Pistol .44|AMT AutoMag]]. |
The [[Python]] was going to be featured and was shown in a screenshot before GTA IV was released. A similar weapon is featured in [[The Ballad of Gay Tony]] DLC, but modeled after a semi-automatic [[Pistol .44|AMT AutoMag]]. |
||
| − | |||
*[[Silenced Pistol]] |
*[[Silenced Pistol]] |
||
Just like the Python, a [[Silenced Pistol]] was spotted in a pre-release screenshot, but was cut before the game's release. A sound file and the texture still exist in the game files, and the pistol can be re-enabled via mods. |
Just like the Python, a [[Silenced Pistol]] was spotted in a pre-release screenshot, but was cut before the game's release. A sound file and the texture still exist in the game files, and the pistol can be re-enabled via mods. |
||
| + | *[[Sledgehammer]] |
||
| − | |||
| + | *[[Hammer]] |
||
| − | ==See also== |
||
| + | *[[Zastava M70]] |
||
| − | *[[Weapons in The Lost and Damned]] |
||
| + | *[[Nailgun]] |
||
| − | *[[Weapons in The Ballad of Gay Tony]] |
||
==Gallery== |
==Gallery== |
||
<gallery widths="180"> |
<gallery widths="180"> |
||
| − | Little Jacob's weapons.jpg|[[Little Jacob]]'s guns car at mission [[First Date (GTA IV)|First Date]]. The shotgun is a Pump Shotgun rather than the Combat Shotgun actual in Little Jacob's car. |
+ | Little Jacob's weapons.jpg|[[Little Jacob]]'s [[Virgo|guns car]] at mission [[First Date (GTA IV)|First Date]]. The shotgun is a Pump Shotgun rather than the Combat Shotgun actual in Little Jacob's car. |
GTA_IV.jpg|Weapon icons in GTA IV |
GTA_IV.jpg|Weapon icons in GTA IV |
||
</gallery> |
</gallery> |
||
| + | |||
| + | ==Trivia== |
||
| + | * When any of the protagonists in the GTA IV trinity wields a weapon, they appear to get the weapon from the inside of their shirt/jacket realistically, which is different from the [[3D Universe]], which the weapon appears in the character's hands out of nowhere (called [[wp:Hammerspace|Hammerspace]]) when going through your inventory. |
||
| + | |||
| + | ==See also== |
||
| + | *[[Weapons in The Lost and Damned]] |
||
| + | *[[Weapons in The Ballad of Gay Tony]] |
||
| + | *[[Weapon Vehicles]] |
||
==Navigation== |
==Navigation== |
||
| + | {{Navboxes |
||
| − | {{Weapons}} |
||
| + | |title= Navigation |
||
| − | {{gtaiv}} |
||
| + | |list1= |
||
| − | {{GTA}} |
||
| + | {{GTA|state=collapsed}} |
||
| + | {{Gtaiv|state=collapsed}} |
||
| + | {{Weapons|state=collapsed}} |
||
| + | {{Gtaiv weapons|state=collapsed}} |
||
| + | }} |
||
[[es:Armas de Grand Theft Auto IV]] |
[[es:Armas de Grand Theft Auto IV]] |
||
Revision as of 18:18, 2 June 2015
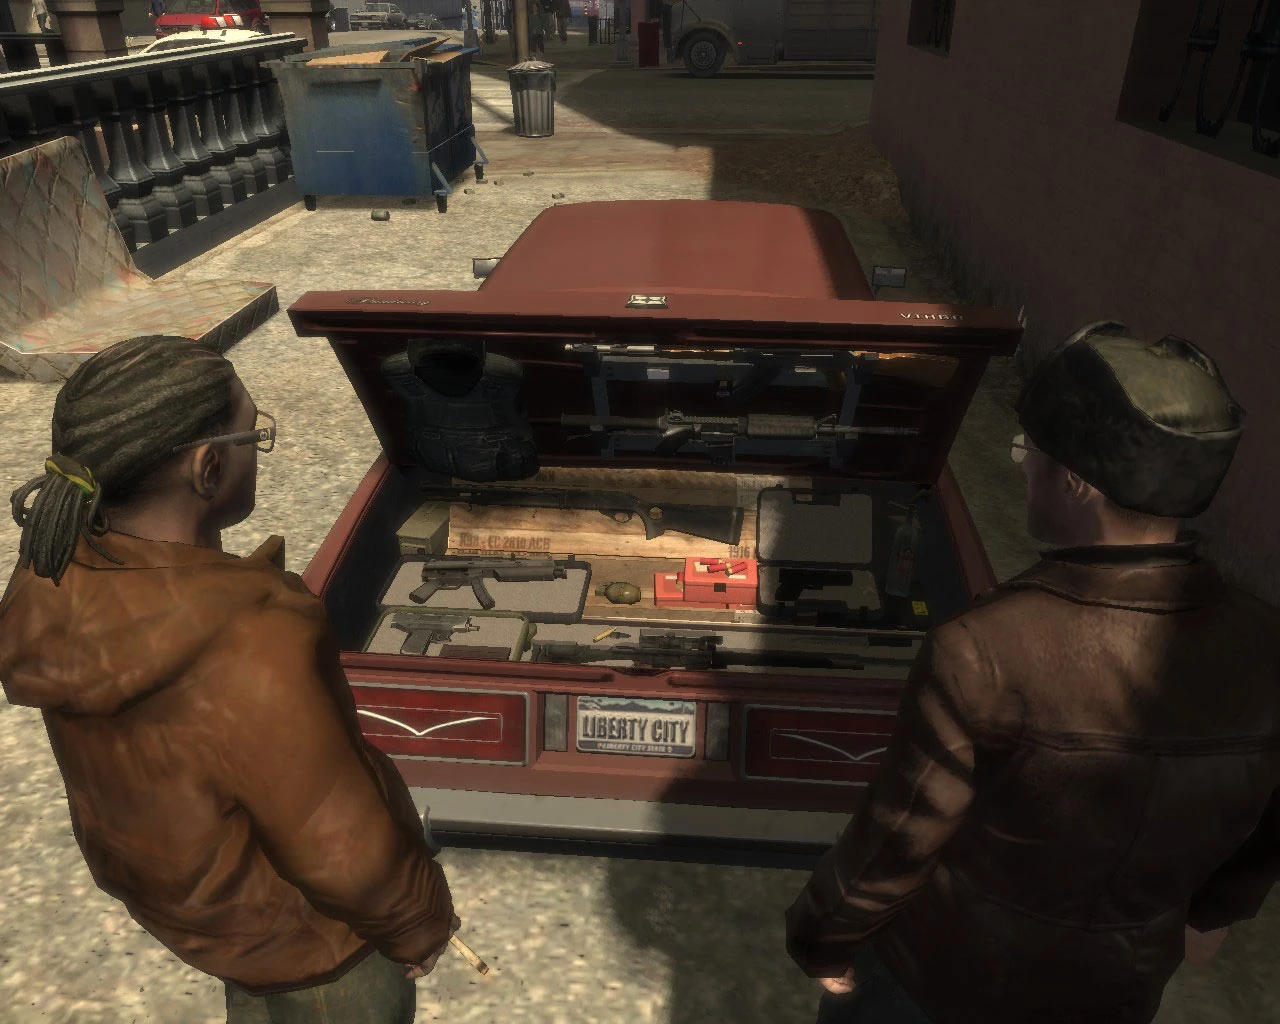
The player can buy weapons through Little Jacob |
Weapons play a major role in Grand Theft Auto IV, with a total of 15 in the game. As with previous titles, they can be found in random locations across Liberty City, and can also be purchased from underground gun shops, dropped by NPCs, and given to the player in missions.
Unlike previous titles, the weapons in GTA IV have two strength tiers instead of the usual three. Also there are no model names for weapons (For example, M4A1 is called Carbine Rifle). Also, weapons spawned in the map or dropped by an NPC will not float in the air, like in previous installments; they will instead lie on the ground and emit a slight orange glow, in order to be more noticeable to the player. Dropped guns act like any other interactable prop in the game; they can be moved if anything touches them (vehicle, NPCs, bullets, etc.)
Dealers
One of the city's underground gun stores.
Much like the real New York City, the civilian sale and ownership of firearms in Liberty City is illegal. Keeping in line with the political reality satirized by the game, the Ammu-Nation shops found in previous GTAs have been closed down due to the strict laws imposed by the mayor. Taking their place, however, are a number of shady, underground gun shops located in basements and alleys around the city. Niko is introduced to these shops by Dimitri Rascalov in the mission Do You Have Protection?
Additionally, if Niko has earned enough respect with Little Jacob through friend activities, the player has the option to call him to meet up nearby with a vehicle full of weapons at discounted prices.
Unlike prior games, the player does not need to purchase multiple instances of firearms to stock up on ammunition. Instead, the player buys one gun for a high price and pays a much smaller amount for each additional magazine or round. However, the player now has a limit on how much ammunition he can carry for each weapon. This limit is removed upon reaching 100% completion.
Melee
Fist
| Image | Stats | Damage | Speed | Unlocked after: | Cost |
|---|---|---|---|---|---|
Fist |
N/A | Minimum | Medium | The Cousins Bellic | Free |
Unarmed, the player is able to dodge attacks, disarm opponents, perform ground punches and kicks, left and right hooks, and uppercuts and jabs. Moves can be strung together to create a combo. On some occasions, the player can perform "stun" hits that render the opponent unable to block momentarily and makes them more vulnerable to strikes. On rare occasions, such as in the mission Clean Getaway, the player can perform a "stun" knockout hit, where if they lock on to a target and approach them without them noticing the player, the target becomes a blink red dot and the player can perform an uppercut, knocking the target out instantly. Fighting unarmed is the best way to fight someone without killing them.
With the Fist selected as the current weapon, the player can pick up random objects off the streets such as a bricks and bottles. However, the player cannot switch weapons while an item is picked up. All items on the street that the player picks up do the same damage when thrown at someone. Objects which can be picked up and thrown will not disappear no matter how far away it is from the player. Using an example, if the player picks up an object from a rooftop and throws it down the from the balcony, the player will still find the object which he/she threw earlier on in its original condition on the ground when the player reaches street level.
Baseball Bat
| Image | Stats | Damage | Speed | Unlocked after: | Cost |
|---|---|---|---|---|---|
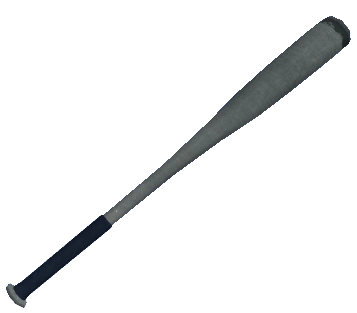 Baseball Bat |
N/A | 20 | Medium | Do You Have Protection? | $5 |
The Baseball_Bat can be used to block attacks with it. The bat can be useful when the player doesn't want to draw attention to themselves, since it is considered a "silent" weapon, though less so than the Knife. The bat is a superior weapon against an unprotected opponent to the Knife, as it will often knock them down in one or two blows and they cannot block them. It can also knock weapons out of opponent's hands when they are aiming in the direction of the player.
Knife
| Image | Stats | Damage | Speed | Unlocked after: | Cost |
|---|---|---|---|---|---|
Knife |
N/A | 15 | High | The Cousins Bellic | $100 (Contact) |
Knives are very efficient alternatives to firearms. Jabs can be delivered quickly (quicker than using fist attacks) and even a well-armored adversary can be taken down with 3 to 6 slashes. They are very effective at taking someone down without getting police attention. This is helpful on the street and in missions when attracting police attention isn't the best idea. Unlike GTA San Andreas and GTA V, however, the player cannot execute stealth kills with the knife.
Handguns
Handguns are the most widespread firearms in the game. While not particularly powerful, they can be very effective when used properly, especially when the player aims for the head of a target. Handguns are best suited for close to medium ranges and can be used from a vehicle. They are the only weapons which can be used for a cinematic execution.
Pistol
| Image | Stats | Magazine Size | Measured Fire Rate (Standard) | Measured Fire Rate (drive-by shooting) | Measured Fire Rate (When falling or being burned) | Measured Fire Rate (When blind firing from cover) | Unlocked after: | Cost |
|---|---|---|---|---|---|---|---|---|
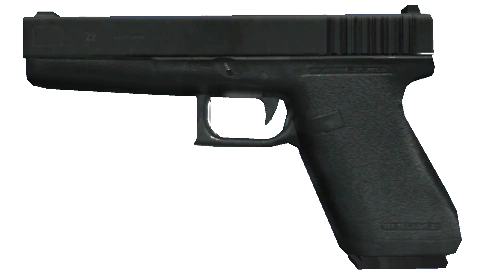 Pistol |
Damage: 2.6/10.0 Fire Rate: 4.0/10.0 Accuracy: 4.0/10.0 Range: 2.5/10.0 |
17 | 180 | 130 | 170 | 150-300 | Do You Have Protection? | $600 (Gun Shop $420 (Contact) |
It is the standard pistol, eponymous with the Police and much of the game's opponents early in the story. It has a decent range when shooting, and takes about 4 to 6 body shots to kill or mortally wound an unarmored opponent. Even though its 17-round magazine capacity is consistent with the 9x19mm Glock 17, a close look at the gun reveals that "22" is written on the slide, confirming that it is a .40 S&W Glock 22, which has a 15-round magazine.
Combat Pistol
| Image | Stats | Magazine Size | Measured Fire Rate (Standard) | Measured Fire Rate (drive-by shooting) | Measured Fire Rate (When falling or being burned) | Measured Fire Rate (When blind firing from cover) | Unlocked after: | Cost |
|---|---|---|---|---|---|---|---|---|
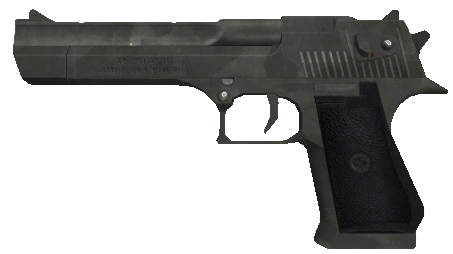 Combat Pistol |
Damage: 2.7/10.0 Fire Rate: 4.0/10.0 Accuracy: 5.0/10.0 Range: 3.0/10.0 |
9 | 180 | 130 | 170 | 150-300 | Museum Piece | $1,500 |
The Combat Pistol is much more powerful than the standard pistol, with a higher range, accuracy and damage overall. Its 9-round capacity suggests it is based on the .357 Magnum variant of the Desert Eagle.
Sub-Machine Guns
Sub-machine guns are the next step up from shotguns and pistols. They're most effective at close-to-medium range while running and gunning at targets to quickly cycle through them, but are ineffective at long distances unless carefully aimed. The player should fire in bursts when engaging mid-range targets and only fire in full auto when confronted up-close. These are preferred over pistols when doing drive-bys or chasing down an escaping car and are the strongest weapons that can be used while doing so, unless the situation allows Hand Grenades to be employed.
Micro SMG
| Image | Stats | Magazine Size | Measured Fire Rate (Standard) | Measured Fire Rate (drive-by shooting) | Measured Fire Rate (When falling or being burned) | Measured Fire Rate (When blind firing from cover) | Unlocked after: | Cost |
|---|---|---|---|---|---|---|---|---|
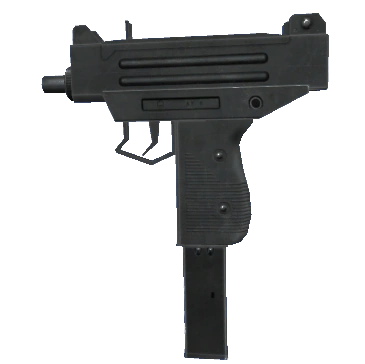 Micro SMG |
Damage: 2.1/10.0 Fire Rate: 6.0/10.0 Accuracy: 3.0/10.0 Range: 2.5/10.0 |
50 | 650 | 450 | 800 | 550 | Do You Have Protection? | $1,200 (Gun Shop) $840 (Contact) |
The Micro-SMG has a high magazine capacity and rate of fire, making it ideal for close quarter engagements, spraying and praying, and drive-bys. By aiming at certain body parts, the Mirco-SMG's spray can be focused to raise its effectiveness.
SMG
| Image | Stats | Magazine Size | Measured Fire Rate (Standard) | Measured Fire Rate (drive-by shooting) | Measured Fire Rate (When falling or being burned) | Measured Fire Rate (When blind firing from cover) | Unlocked after: | Cost |
|---|---|---|---|---|---|---|---|---|
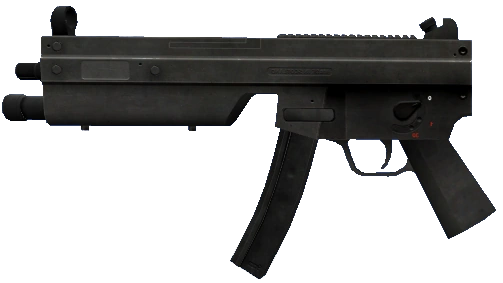 SMG |
Damage: 2.2/10.0 Fire Rate: 5.5/10.0 Accuracy: 4.0/10.0 Range: 3.5/10.0 |
30 | 650 | 450 | 800 | 550 | Luck of the Irish | $2,500 (Gun Shop) $1,750 (Contact) |
NOOSE units and FIB agents use the SMG from their vehicles at 5 and 6 Wanted Stars when they attempt to stop the player. It has a lower magazine capacity and rate of fire than the Micro-SMG, but is more powerful and accurate with a higher range. Head and body shots are particularly effective.
The MP5A3 was originally featured as seen in an early BETA screenshot, but for some reason it was replaced with the MP-10. It was likely because realistically the MP5 would be too big to be operable as a drive-by weapon, a key feature of SMGs in the series.
Shotguns
Shotguns are somewhere between Pistols and SMGs. They are extremely powerful at close range and are often one-to-two hit kills. They deal far more damage per shot than pistols and SMGs, but fire more slowly to compensate, so they aren't ideal when fighting a large group of enemies while running-and-gunning out in the open. They are best used while using cover for laying down a small number of enemies during close combat and in surprise attacks.
Pump Shotgun
| Image | Stats | Magazine Size | Measured Fire Rate (Standard) | Measured Fire Rate (drive-by shooting) | Measured Fire Rate (When falling or being burned) | Measured Fire Rate (When blind firing from cover) | Unlocked after: | Cost |
|---|---|---|---|---|---|---|---|---|
Pump Shotgun |
Damage: 6.7/10.0 Fire Rate: 2.0/10.0 Accuracy: 3.0/10.0 Range: 2.0/10.0 |
8 | 50 | N/A | 80 | 60 | Do You Have Protection? | $1,200 (Gun Shop) $840 (Contact) |
The Pump shotgun appears as a Remington Model 870 though it gets its design of the "Auto Hardball Model 870 Airsoft" version. It used by some police officers and NOOSE units, the Pump Shotgun is a deadly force in both the player's hands and in the hands of opponents. In close quarter engagements, it is capable of killing or depleting armor in one shot, but suffers at medium-to-long range to due the high pellet spread.
Combat Shotgun
| Image | Stats | Magazine Size | Measured Fire Rate (Standard) | Measured Fire Rate (drive-by shooting) | Measured Fire Rate (When falling or being burned) | Measured Fire Rate (When blind firing from cover) | Unlocked after: | Cost |
|---|---|---|---|---|---|---|---|---|
Combat Shotgun |
Damage: 9.6/10.0 Fire Rate: 2.0/10.0 Accuracy: 2.0/10.0 Range: 1.5/10. |
10 | 140 | N/A | 130 | 50 | Blow Your Cover | $2,500 (Gun Shop) $1,500 (Contact) |
The Combat Shotgun is a powerful tool for disposing of enemies quickly and efficiently. It should be taken into account that it burns through ammo quickly and is overall not as powerful as the Pump Shotgun, but has a far greater range. It can be obtained when the player enters a Police Cruiser, however law enforcement are never seen using this weapon, opting to use the Pump Shotgun instead.
Due to its presence in previous games and its appearance in a piece of GTA IV concept art, it was widely thought before the game's release that the Franchi SPAS-12 was to be in the game, but the developers evidently opted for the Remington 1100 Tac 4 instead.
Assault Rifles
The iconic assault rifles fill the niche between sniper rifles and SMGs. While they are more powerful and accurate than SMGs, assault rifles are also more expensive and cannot be fired while operating a vehicle. They can however be fired from any of the three passenger seats of a helicopter or boat. Assault rifles are most effective when fired in bursts at medium to long ranges.
Assault Rifle
| Image | Stats | Magazine Size | Measured Fire Rate (Standard) | Measured Fire Rate (drive-by shooting) | Measured Fire Rate (When falling or being burned) | Measured Fire Rate (When blind firing from cover) | Unlocked after: | Cost |
|---|---|---|---|---|---|---|---|---|
Assault Rifle |
Damage: 3.0/10.0 Fire Rate: 6.0/10.0 Accuracy: 4.5/10.0 Range: 4.5/10.0 |
30 | 450 | N/A | 400 | 600 | Deconstruction for Beginners | $3,500 (Gun Shop) $2,450 (Contact) |
The Assault Rifle has high power, accuracy and range, making it ideal for use in many missions and situations. When the Carbine Rifle is unlocked however, it is overshadowed.
Carbine Rifle
| Image | Stats | Magazine Size | Measured Fire Rate (Standard) | Measured Fire Rate (drive-by shooting) | Measured Fire Rate (When falling or being burned) | Measured Fire Rate (When blind firing from cover) | Unlocked after: | Cost |
|---|---|---|---|---|---|---|---|---|
Carbine Rifle |
Damage: 3.2/10.0 Fire Rate: 6.5/10.0 Accuracy: 5.5/10.0 Range: 4.5/10.0 |
30 | 450 | N/A | 400 | 600 | Three Leaf Clover | $5,000 (Gun Shop) $3,500 (Contact) |
Early in the game before it is unlocked, the Carbine Rifle can be acquired from NOOSE units as well as certain LCPD Officers, specifically those who guard places of high security level like subway stations and landmark areas. FIB agents will also use it against the player. It is much more powerful and accurate than the Assault Rifle, but less common. On the bottom of the magazine there's a joke that says "STOP CHILLIN START KILLIN".
Sniper Rifles
Sniper Rifles are unmatched in precision long range shooting, far more accurate and powerful than Assault Rifles. They do however have low fire rates and small magazine capacities, and therefore should be quickly switched out for a more suitable weapon when confronted up close. Sniper Rifles are good getting the jump on enemies by picking them off from a safe distance, and for providing far-away sniper support for friends in a heated gun battle.
Sniper Rifle
| Image | Stats | Magazine Size | Measured Fire Rate (Standard) | Measured Fire Rate (drive-by shooting) | Measured Fire Rate (When falling or being burned) | Measured Fire Rate (When blind firing from cover) | Unlocked after: | Cost |
|---|---|---|---|---|---|---|---|---|
Sniper Rifle |
Damage: 9.6/10.0 Fire Rate: 2.5/10.0 Accuracy: 7.0/10.0 Range: 9.5/10.0 |
5 | 48 | N/A | 170 | 150 | Luck of the Irish | $6,000 |
The Sniper Rifle uses a bolt-action mechanism, making it relatively slow-firing, but also extremely accurate and powerful, killing most armored enemies with one shot to the torso or groin. Based on the Remington 700, it oddly has an external box magazine not seen on the real weapon, likely an aftermarket modification.
Combat Sniper
| Image | Stats | Magazine Size | Measured Fire Rate (Standard) | Measured Fire Rate (drive-by shooting) | Measured Fire Rate (When falling or being burned) | Measured Fire Rate (When blind firing from cover) | Unlocked after: | Cost |
|---|---|---|---|---|---|---|---|---|
Combat Sniper |
Damage: 9.9/10.0 Fire Rate: 2.0/10.0 Accuracy: 9.0/10.0 Range: 10.0/10.0 |
10 | 150 | N/A | 140 | 120 | Deconstruction for Beginners | $8,500 (Gun Shop) $5,000 (Contact) |
The Combat Sniper is semi-automatic, allowing for a deliverence of more rounds on a target than the Sniper Rifle, however it is not as powerful. This weapon is very rarely seen in-game in the hands of NPCs.
Heavy Weapons
RPG
| Image | Stats | Magazine Size | Measured Fire Rate (Standard) | Measured Fire Rate (drive-by shooting) | Measured Fire Rate (When falling or being burned) | Measured Fire Rate (When blind firing from cover) | Unlocked after: | Cost |
|---|---|---|---|---|---|---|---|---|
RPG |
Damage: 10.0/10.0 Fire Rate: 0.5/10.0 Accuracy: 1.0/10.0 Range: 7.0/10.0 |
1 | 20 | N/A | 30 | 15 | Deconstruction for Beginners | $15,000 (Gun Shop) $10,000 (Contact) |
The Rocket Launcher can be blind-fired while in cover and is a largely devastating weapon, destroying all vehicles in the game, bar the NOOSE APC, in one direct hit. Its high splash damage will likely destroy or maime other vehicles in the vicinity. The weapon is aimed from an over-the-shoulder perspective, allowing the player to move while aiming, unlike in the GTA III era where the player was forced into a stationary first-person perspective. Also unlike the GTA III era, the player does not need a direct hit on the fuselage of a helicopter to take it down as the force of the detonating rocket can cause a helicopter pilot to lose control and crash. It is, by far, one of the deadliest weapons in the game, however, misuse of the RPG can result in the player's own death.
Thrown
Thrown weapons are useful when engaging groups of enemies. They are more versatile in GTA IV are more than they were in the 3D Universe; they can be thrown forwards with precision aim, dropped by pressing the fire button without holding the aim button, or thrown from vehicles. Carelessness with thrown weapons, such as overcooking a grenade or walking into flames caused by a Molotov, can result in the player's death.
Molotov Cocktail
| Image | Stats | Unlocked after: | Cost |
|---|---|---|---|
 Molotov Cocktail |
Damage: 5.0/10.0 Fire Rate: 2.0/10.0 Accuracy: 2.0/10.0 Range: 0.8/10.0 |
Do You Have Protection? | $500 (Gun Shop) $350 (Contact) |
The Molotov Cocktail, named after 1920s Soviet politician Vyacheslav Molotov, is a crude but effective weapon that creates a large burst of flames on the target. The player can toss Molotov's behind themselves to fend off pursuers or use it to set vehicles on fire, weeding opponents out of cover. Any target caught in flames is defenseless and offenseless while burning, allowing the player to finish off the target easily or focus on others.
The player must be careful not to get burned as exposure to the fire loses a large portion of health or armor and Niko will be left thrashing on the ground until he puts himself out, vulnerable to further attack the entire time.
Grenade
| Image | Stats | Unlocked after: | Cost |
|---|---|---|---|
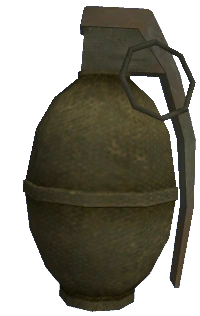
|
Damage: 9.5/10.0 Fire Rate: 2.0/10.0 Accuracy: 1.0/10.0 Range: 1.5/10.0 |
Deconstruction for Beginners | $1,000 (Gun Shop) $700 (Contact) |
The Grenade is excellent at clearing rooms full of enemies and taking out vehicles. They can be tossed underhanded, thrown overhanded, or dropped from behind while running. The player can shorten the detonation timer by cooking a grenade, which is done by holding the fire button. When cooking a grenade, it begins beeping if held for too long. The grenade is an effective drive-by weapon, as a well timed grenade can disable or destroy a pursuing vehicle, but the player must be careful not to catch their own vehicle in the explosion.
BETA Weapons
full article: Beta Weapons
The MP5 was seen in a pre-release screenshot for GTA IV with a 15-round magazine
In game art for the game, a NOOSE Tactical Response Unit officer is seen using an M16A1. Mods allow for the Carbine to be replaced with this weapon; in this case, with an added scope [1].
The Python was going to be featured and was shown in a screenshot before GTA IV was released. A similar weapon is featured in The Ballad of Gay Tony DLC, but modeled after a semi-automatic AMT AutoMag.
Just like the Python, a Silenced Pistol was spotted in a pre-release screenshot, but was cut before the game's release. A sound file and the texture still exist in the game files, and the pistol can be re-enabled via mods.
Gallery
")
")
Trivia
- When any of the protagonists in the GTA IV trinity wields a weapon, they appear to get the weapon from the inside of their shirt/jacket realistically, which is different from the 3D Universe, which the weapon appears in the character's hands out of nowhere (called Hammerspace) when going through your inventory.