DocVinewood (talk | contribs) Tag: rte-wysiwyg |
|||
| (36 intermediate revisions by 10 users not shown) | |||
| Line 1: | Line 1: | ||
[[File:Gallery245.jpg|thumb|180px|The reward of spraying all gang tags in Los Santos. A Sawn-Off Shotgun, Molotov Cocktails, an AK-47 and a TEC-9 will spawn at Carl's Home in Grove Street.]] |
[[File:Gallery245.jpg|thumb|180px|The reward of spraying all gang tags in Los Santos. A Sawn-Off Shotgun, Molotov Cocktails, an AK-47 and a TEC-9 will spawn at Carl's Home in Grove Street.]] |
||
| − | '''Gang Tags''', or '''graffiti tags''', are a type of [[Collectibles|collectible item]] in [[Grand Theft Auto: San Andreas]]. [[Carl Johnson]] has to search for a total of 100 gang tags all around [[Los Santos]] and spray over them the [[Grove Street Families]]' tag with a [[Spray Can|spray can]]. For a tag to be |
+ | '''Gang Tags''', or '''graffiti tags''', are a type of [[Collectibles|collectible item]] in [[Grand Theft Auto: San Andreas]]. [[Carl Johnson]] has to search for a total of 100 gang tags all around [[Los Santos (3D Universe)|Los Santos]] and spray over them the [[Grove Street Families]]' tag with a [[Spray Can|spray can]]. For a tag to be completely sprayed over it is needed at least 29 units of spray can "ammo". Tags and their basics are first introduced during the mission [[Tagging Up Turf]]. Spraying over an enemy tag increases the player's [[respect]] and respraying all 100 tags is required for [[100% Completion in GTA San Andreas|100%]] completion. The reward for finishing the work with this collectible are the weapons [[Molotov Cocktail]], [[AK-47]], [[Sawn-off Shotgun]] and [[TEC 9]] delivered to the kitchen at the [[Johnson House]], and [[Grove Street Families|Grove Street gang members]] will start to carry [[Desert Eagle]]s, [[MP5]]s and [[Knife|knives]] instead of the usual [[pistol]] and [[TEC 9]]. |
==Locations== |
==Locations== |
||
| + | For locations map and photos of the graffiti see [[Tags/Locations|here]]. |
||
| + | *[[Commerce]] (2) |
||
| − | {|class="wikitable" style="vertical-align:top;" valign="top" |
||
| − | + | *[[Downtown Los Santos (3D Universe)|Downtown]] (3) |
|
| + | *[[East Beach]] (8) |
||
| − | |'''Total''' |
||
| + | *[[East Los Santos]] (11) |
||
| − | |[[File:Fort_Yard_tag.png|40px]] |
||
| + | *[[El Corona]] (6) |
||
| − | |[[File:Kilo_tag.png|40px]] |
||
| + | *[[Ganton]] (2) |
||
| − | |[[File:Rollin_tag.png|40px]] |
||
| + | *[[Glen Park]] (4) |
||
| − | |[[File:Temple_tag.png|40px]] |
||
| + | *[[Idlewood]] (10) |
||
| − | |[[File:Vagos_tag.png|40px]] |
||
| + | *[[Jefferson]] (6) |
||
| − | |[[File:Aztecas_tag.png|40px]] |
||
| + | *[[Las Colinas]] (7) |
||
| − | |[[File:Seville_Tag.png|40px]] |
||
| + | *[[Little Mexico]] (3) |
||
| − | |- |
||
| − | + | *[[Los Flores]] (2) |
|
| + | *[[Los Santos International Airport (3D Universe)|Los Santos International Airport]] (2) |
||
| − | | style="text-align:center;"|8 |
||
| + | *[[Marina]] (2) |
||
| − | | style="text-align:center;"| |
||
| + | *[[Market]] (4) |
||
| − | | style="text-align:center;"| |
||
| + | *[[Mulholland Intersection]] (2) |
||
| − | | style="text-align:center;"| |
||
| + | *[[Ocean Docks]] (5) |
||
| − | | style="text-align:center;"| |
||
| + | *[[Pershing Square|Pershing Square ]](1) |
||
| − | | style="text-align:center;"|8 |
||
| + | *[[Playa del Seville]] (5) |
||
| − | | style="text-align:center;"| |
||
| + | *[[Rodeo]] (2) |
||
| − | | style="text-align:center;"| |
||
| + | *[[Santa Maria Beach]] (2) |
||
| − | |- |
||
| + | *[[Temple]] (1) |
||
| − | |[[East Los Santos]] |
||
| + | *[[Verdant Bluffs]] (1) |
||
| − | | style="text-align:center;"|11 |
||
| + | *[[Verona Beach]] (2) |
||
| − | | style="text-align:center;"|4 |
||
| + | *[[Vinewood (3D Universe)|Vinewood]] (1) |
||
| − | | style="text-align:center;"|2 |
||
| + | *[[Willowfield]] (6) |
||
| − | | style="text-align:center;"|2 |
||
| − | | style="text-align:center;"| |
||
| − | | style="text-align:center;"|3 |
||
| − | | style="text-align:center;"| |
||
| − | | style="text-align:center;"| |
||
| − | |- |
||
| − | |[[El Corona]] |
||
| − | | style="text-align:center;"|6 |
||
| − | | style="text-align:center;"| |
||
| − | | style="text-align:center;"|1 |
||
| − | | style="text-align:center;"| |
||
| − | | style="text-align:center;"| |
||
| − | | style="text-align:center;"| |
||
| − | | style="text-align:center;"|5 |
||
| − | | style="text-align:center;"| |
||
| − | |- |
||
| − | |[[Ganton]] |
||
| − | | style="text-align:center;"|2 |
||
| − | | style="text-align:center;"| |
||
| − | | style="text-align:center;"|2 |
||
| − | | style="text-align:center;"| |
||
| − | | style="text-align:center;"| |
||
| − | | style="text-align:center;"| |
||
| − | | style="text-align:center;"| |
||
| − | | style="text-align:center;"| |
||
| − | |- |
||
| − | |[[Glen Park]] |
||
| − | | style="text-align:center;"|4 |
||
| − | | style="text-align:center;"| |
||
| − | | style="text-align:center;"|4 |
||
| − | | style="text-align:center;"| |
||
| − | | style="text-align:center;"| |
||
| − | | style="text-align:center;"| |
||
| − | | style="text-align:center;"| |
||
| − | | style="text-align:center;"| |
||
| − | |- |
||
| − | |[[Idlewood]] |
||
| − | | style="text-align:center;"|10 |
||
| − | | style="text-align:center;"|10 |
||
| − | | style="text-align:center;"| |
||
| − | | style="text-align:center;"| |
||
| − | | style="text-align:center;"| |
||
| − | | style="text-align:center;"| |
||
| − | | style="text-align:center;"| |
||
| − | | style="text-align:center;"| |
||
| − | |- |
||
| − | |[[Jefferson]] |
||
| − | | style="text-align:center;"|6 |
||
| − | | style="text-align:center;"| |
||
| − | | style="text-align:center;"|1 |
||
| − | | style="text-align:center;"|5 |
||
| − | | style="text-align:center;"| |
||
| − | | style="text-align:center;"| |
||
| − | | style="text-align:center;"| |
||
| − | | style="text-align:center;"| |
||
| − | |- |
||
| − | |[[Las Colinas]] |
||
| − | | style="text-align:center;"|7 |
||
| − | | style="text-align:center;"| |
||
| − | | style="text-align:center;"| |
||
| − | | style="text-align:center;"| |
||
| − | | style="text-align:center;"| |
||
| − | | style="text-align:center;"|7 |
||
| − | | style="text-align:center;"| |
||
| − | | style="text-align:center;"| |
||
| − | |- |
||
| − | |[[Little Mexico]] |
||
| − | | style="text-align:center;"|3 |
||
| − | | style="text-align:center;"| |
||
| − | | style="text-align:center;"| |
||
| − | | style="text-align:center;"| |
||
| − | | style="text-align:center;"| |
||
| − | | style="text-align:center;"| |
||
| − | | style="text-align:center;"|3 |
||
| − | | style="text-align:center;"| |
||
| − | |- |
||
| − | |[[Los Flores]] |
||
| − | | style="text-align:center;"|2 |
||
| − | | style="text-align:center;"| |
||
| − | | style="text-align:center;"| |
||
| − | | style="text-align:center;"| |
||
| − | | style="text-align:center;"| |
||
| − | | style="text-align:center;"|2 |
||
| − | | style="text-align:center;"| |
||
| − | | style="text-align:center;"| |
||
| − | |- |
||
| − | |[[Ocean Docks]] |
||
| − | | style="text-align:center;"|5 |
||
| − | | style="text-align:center;"| |
||
| − | | style="text-align:center;"| |
||
| − | | style="text-align:center;"|1 |
||
| − | | style="text-align:center;"|1 |
||
| − | | style="text-align:center;"|2 |
||
| − | | style="text-align:center;"|1 |
||
| − | | style="text-align:center;"| |
||
| − | |- |
||
| − | |[[Playa del Seville]] |
||
| − | | style="text-align:center;"|5 |
||
| − | | style="text-align:center;"|1 |
||
| − | | style="text-align:center;"| |
||
| − | | style="text-align:center;"| |
||
| − | | style="text-align:center;"| |
||
| − | | style="text-align:center;"| |
||
| − | | style="text-align:center;"| |
||
| − | | style="text-align:center;"|4 |
||
| − | |- |
||
| − | |[[Willowfield]] |
||
| − | | style="text-align:center;"|6 |
||
| − | | style="text-align:center;"|1 |
||
| − | | style="text-align:center;"|2 |
||
| − | | style="text-align:center;"|2 |
||
| − | | style="text-align:center;"| |
||
| − | | style="text-align:center;"| |
||
| − | | style="text-align:center;"|1 |
||
| − | | style="text-align:center;"| |
||
| − | |} |
||
| − | *East Beach |
||
| − | <gallery widths="180" orientation="square" captionposition="below" captionsize="small" captiontextcolor="#ffffff"> |
||
| − | Gangtags 030b.jpg|№82 - Further to the north following the highway is a huge blue building with two smaller houses next to it. The tag is, seen on the screenshot, on the left of these two smaller houses. |
||
| − | Gangtags_031b.JPG|№83 - Search for the bridge going over the road in Los Flores, like on the first screenshot. Next to the last house before the bridge is a road that leads around the house. The tag is on the back of this house. You have to climb over a stone wall to reach it. |
||
| − | Gangtags 029b.jpg|№84 - North of the pedestrian bridge across the highway are a number of white houses. The tag is on the roof of the last white house. You can easily access the roof of the house at the back. By using the hill to jump onto the part where the tag is. |
||
| − | Gangtags_033b.JPG|№85 - Coming from the Los Santos Stadium going towards the hills there is a street on the left with a tall parkinggarage. The tag is on the inside on the right wall on the ground floor. |
||
| − | Gangtags_032a.JPG|№86 - In the wide street leading into the hills from the stadium, are a few tall appartment buildings. The tag on the bottom of the building. |
||
| − | Gangtags_036b.JPG|№87 - In East Beach is a factory with two chimneys, that should be easy to spot. The tag is on the wall off the factory next to the road that makes an S-turn. |
||
| − | Gangtags_034b.JPG|№89 - North of the Los Santos Stadium is a group of houses with a parking lot in the middle. You can find these houses near the pedestrian bridge crossing the highway. You can find the tag in the southwest corner of this parking lot. |
||
| − | Gangtags_035b.JPG|№90 - This tag should be easy to find. It is on the southeast side of the Los Santos Stadium. |
||
| − | </gallery> |
||
| − | |||
| − | {|class="wikitable" style="vertical-align:top;" valign="top" |
||
| − | !'''Central Los Santos' Districts''' |
||
| − | |'''Total''' |
||
| − | |[[File:Fort_Yard_tag.png|40px]] |
||
| − | |[[File:Kilo_tag.png|40px]] |
||
| − | |[[File:Rollin_tag.png|40px]] |
||
| − | |[[File:Temple_tag.png|40px]] |
||
| − | |[[File:Vagos_tag.png|40px]] |
||
| − | |[[File:Aztecas_tag.png|40px]] |
||
| − | |[[File:Seville_Tag.png|40px]] |
||
| − | |- |
||
| − | |[[Commerce]] |
||
| − | | style="text-align:center;"|2 |
||
| − | | style="text-align:center;"| |
||
| − | | style="text-align:center;"| |
||
| − | | style="text-align:center;"|1 |
||
| − | | style="text-align:center;"| |
||
| − | | style="text-align:center;"|1 |
||
| − | | style="text-align:center;"| |
||
| − | | style="text-align:center;"| |
||
| − | |- |
||
| − | |[[Downtown]] |
||
| − | | style="text-align:center;"|3 |
||
| − | | style="text-align:center;"| |
||
| − | | style="text-align:center;"|2 |
||
| − | | style="text-align:center;"| |
||
| − | | style="text-align:center;"| |
||
| − | | style="text-align:center;"| |
||
| − | | style="text-align:center;"|1 |
||
| − | | style="text-align:center;"| |
||
| − | |- |
||
| − | |[[Los Santos International Airport (3D Universe)|Los Santos International Airport]] |
||
| − | | style="text-align:center;"|2 |
||
| − | | style="text-align:center;"| |
||
| − | | style="text-align:center;"|1 |
||
| − | | style="text-align:center;"|1 |
||
| − | | style="text-align:center;"| |
||
| − | | style="text-align:center;"| |
||
| − | | style="text-align:center;"| |
||
| − | | style="text-align:center;"| |
||
| − | |- |
||
| − | |[[Mulholland Intersection]] |
||
| − | | style="text-align:center;"|2 |
||
| − | | style="text-align:center;"| |
||
| − | | style="text-align:center;"|1 |
||
| − | | style="text-align:center;"| |
||
| − | | style="text-align:center;"| |
||
| − | | style="text-align:center;"|1 |
||
| − | | style="text-align:center;"| |
||
| − | | style="text-align:center;"| |
||
| − | |- |
||
| − | |[[Pershing Square]] |
||
| − | | style="text-align:center;"|1 |
||
| − | | style="text-align:center;"| |
||
| − | | style="text-align:center;"|1 |
||
| − | | style="text-align:center;"| |
||
| − | | style="text-align:center;"| |
||
| − | | style="text-align:center;"| |
||
| − | | style="text-align:center;"| |
||
| − | | style="text-align:center;"| |
||
| − | |- |
||
| − | |[[Verdant Bluffs]] |
||
| − | | style="text-align:center;"|1 |
||
| − | | style="text-align:center;"| |
||
| − | | style="text-align:center;"| |
||
| − | | style="text-align:center;"| |
||
| − | | style="text-align:center;"| |
||
| − | | style="text-align:center;"|1 |
||
| − | | style="text-align:center;"| |
||
| − | | style="text-align:center;"| |
||
| − | |- |
||
| − | !'''Western Los Santos' Districts''' |
||
| − | |'''Total''' |
||
| − | |[[File:Fort_Yard_tag.png|40px]] |
||
| − | |[[File:Kilo_tag.png|40px]] |
||
| − | |[[File:Rollin_tag.png|40px]] |
||
| − | |[[File:Temple_tag.png|40px]] |
||
| − | |[[File:Vagos_tag.png|40px]] |
||
| − | |[[File:Aztecas_tag.png|40px]] |
||
| − | |[[File:Seville_Tag.png|40px]] |
||
| − | |- |
||
| − | |[[Marina]] |
||
| − | | style="text-align:center;"|2 |
||
| − | | style="text-align:center;"| |
||
| − | | style="text-align:center;"| |
||
| − | | style="text-align:center;"| |
||
| − | | style="text-align:center;"|2 |
||
| − | | style="text-align:center;"| |
||
| − | | style="text-align:center;"| |
||
| − | | style="text-align:center;"| |
||
| − | |- |
||
| − | |[[Market]] |
||
| − | | style="text-align:center;"|4 |
||
| − | | style="text-align:center;"|1 |
||
| − | | style="text-align:center;"| |
||
| − | | style="text-align:center;"| |
||
| − | | style="text-align:center;"|3 |
||
| − | | style="text-align:center;"| |
||
| − | | style="text-align:center;"| |
||
| − | | style="text-align:center;"| |
||
| − | |- |
||
| − | |[[Rodeo]] |
||
| − | | style="text-align:center;"|2 |
||
| − | | style="text-align:center;"| |
||
| − | | style="text-align:center;"| |
||
| − | | style="text-align:center;"| |
||
| − | | style="text-align:center;"|2 |
||
| − | | style="text-align:center;"| |
||
| − | | style="text-align:center;"| |
||
| − | | style="text-align:center;"| |
||
| − | |- |
||
| − | |[[Santa Maria Beach]] |
||
| − | | style="text-align:center;"|2 |
||
| − | | style="text-align:center;"|1 |
||
| − | | style="text-align:center;"| |
||
| − | | style="text-align:center;"| |
||
| − | | style="text-align:center;"|1 |
||
| − | | style="text-align:center;"| |
||
| − | | style="text-align:center;"| |
||
| − | | style="text-align:center;"| |
||
| − | |- |
||
| − | |[[Temple]] |
||
| − | | style="text-align:center;"|1 |
||
| − | | style="text-align:center;"| |
||
| − | | style="text-align:center;"| |
||
| − | | style="text-align:center;"| |
||
| − | | style="text-align:center;"|1 |
||
| − | | style="text-align:center;"| |
||
| − | | style="text-align:center;"| |
||
| − | | style="text-align:center;"| |
||
| − | |- |
||
| − | |[[Verona Beach]] |
||
| − | | style="text-align:center;"|2 |
||
| − | | style="text-align:center;"| |
||
| − | | style="text-align:center;"|1 |
||
| − | | style="text-align:center;"|1 |
||
| − | | style="text-align:center;"| |
||
| − | | style="text-align:center;"| |
||
| − | | style="text-align:center;"| |
||
| − | | style="text-align:center;"| |
||
| − | |- |
||
| − | |[[Vinewood]] |
||
| − | | style="text-align:center;"|1 |
||
| − | | style="text-align:center;"| |
||
| − | | style="text-align:center;"| |
||
| − | | style="text-align:center;"| |
||
| − | | style="text-align:center;"|1 |
||
| − | | style="text-align:center;"| |
||
| − | | style="text-align:center;"| |
||
| − | | style="text-align:center;"| |
||
| − | |} |
||
| − | |||
==Gallery== |
==Gallery== |
||
<gallery> |
<gallery> |
||
Image:Grove tag.png|The gang tag for [[Grove Street Families]] and the one the player resprays over enemy tags |
Image:Grove tag.png|The gang tag for [[Grove Street Families]] and the one the player resprays over enemy tags |
||
Image:Seville Tag.png|Seville Boulevard Families' tag |
Image:Seville Tag.png|Seville Boulevard Families' tag |
||
| − | Image:Fort Yard tag.png|Front Yard [[Ballas]] set |
+ | Image:Fort Yard tag.png|Front Yard [[Ballas (3D Universe)|Ballas]] set |
Image:Kilo tag.png|Kilo Tray Ballas set |
Image:Kilo tag.png|Kilo Tray Ballas set |
||
Image:Rollin tag.png|Rollin' Heights Ballas set |
Image:Rollin tag.png|Rollin' Heights Ballas set |
||
Image:Temple tag.png|Temple Drive Ballas' set |
Image:Temple tag.png|Temple Drive Ballas' set |
||
| − | Image:Vagos tag.png|The [[Los Santos Vagos]]' gang tag |
+ | Image:Vagos tag.png|The [[Los Santos Vagos (3D Universe)|Los Santos Vagos]]' gang tag |
| − | Image:Aztecas tag.png|[[Varrios Los Aztecas]] |
+ | Image:Aztecas tag.png|[[Varrios Los Aztecas (3D Universe)|Varrios Los Aztecas]] |
Image:San Fierro Rifa tag.png|Unused tag for [[San Fierro Rifa]] |
Image:San Fierro Rifa tag.png|Unused tag for [[San Fierro Rifa]] |
||
tags.gif|Tags' locations |
tags.gif|Tags' locations |
||
| Line 325: | Line 47: | ||
==Trivia== |
==Trivia== |
||
| − | * If the police spot Carl spraying a tag, a [[Wanted Level]] will be applied, which should be noted with tags located in high-traffic areas. This is because the spray can is counted as a weapon, and "shooting" a weapon will cause you to attain a wanted star when the police see you, though a "real-world" perspective can also be applied in that spraying graffiti is generally considered an illegal act by itself. |
+ | * If the police spot Carl spraying a tag, a [[Wanted Level in 3D Universe|Wanted Level]] will be applied, which should be noted with tags located in high-traffic areas. This is because the spray can is counted as a weapon, and "shooting" a weapon will cause you to attain a wanted star when the police see you, though a "real-world" perspective can also be applied in that spraying graffiti is generally considered an illegal act by itself. |
| − | * A tag is not considered completely sprayed until you see the on-screen message confirming it and you hear the |
+ | * A tag is not considered completely sprayed until you see the on-screen message confirming it and you hear the confirmation sound. |
| − | * Spraying over any tags that will be used before the mission |
+ | * Spraying over any tags that will be used before the mission [[Tagging Up Turf]] will result in the tag being reset and you must respray every tag in that mission again. |
| − | * Before you unlock the [[Spray Can|spray can]] item in the[[The Johnson House| |
+ | * Before you unlock the [[Spray Can|spray can]] item in the [[The Johnson House|Johnson house]], you can find one on the rooftops of the shops directly behind the house, which can be obtained by jumping onto the low wall in the alley between the Johnson house and [[Ryder's House|Ryder's house]]. |
| − | * The [[Varrios Los Aztecas]] gang tag is orange (like the Vagos'), however, their gang color is turquoise |
+ | * The [[Varrios Los Aztecas (3D Universe)|Varrios Los Aztecas]] gang tag is orange (like the Vagos'), however, their gang color is turquoise in the beta. |
* From the start of the game up until [[Sweet]]'s arrest in [[The Green Sabre]], the [[Temple]] area is territory of the Temple Drive Families. It is only after that mission that Temple gets occupied by the [[Ballas (3D Universe)|Ballas]], so it must have been a mistake as to why 'Temple Drive Ballas' tags are present right at the beginning. |
* From the start of the game up until [[Sweet]]'s arrest in [[The Green Sabre]], the [[Temple]] area is territory of the Temple Drive Families. It is only after that mission that Temple gets occupied by the [[Ballas (3D Universe)|Ballas]], so it must have been a mistake as to why 'Temple Drive Ballas' tags are present right at the beginning. |
||
* Spraying all the tags won't reward the player very much respect, the respect rewarded will be very small, despite the game telling you that spraying a tag will gain [[CJ]] respect in the mission [[Tagging Up Turf]] . |
* Spraying all the tags won't reward the player very much respect, the respect rewarded will be very small, despite the game telling you that spraying a tag will gain [[CJ]] respect in the mission [[Tagging Up Turf]] . |
||
| Line 336: | Line 58: | ||
<center> |
<center> |
||
| − | [[File:GTA San Andreas - 100 Tags Guide (Complete)| |
+ | [[File:GTA San Andreas - 100 Tags Guide (Complete)|thumb|left|525px]] |
</center> |
</center> |
||
| + | {{Clr}} |
||
==See also== |
==See also== |
||
*[[Tags/Locations|Tags Locations]] |
*[[Tags/Locations|Tags Locations]] |
||
Revision as of 22:02, 5 August 2015
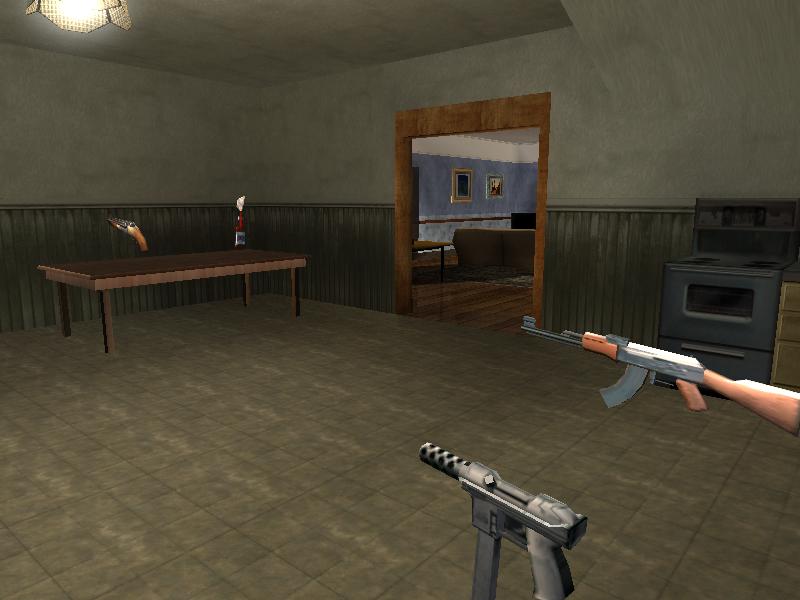
The reward of spraying all gang tags in Los Santos. A Sawn-Off Shotgun, Molotov Cocktails, an AK-47 and a TEC-9 will spawn at Carl's Home in Grove Street.
Gang Tags, or graffiti tags, are a type of collectible item in Grand Theft Auto: San Andreas. Carl Johnson has to search for a total of 100 gang tags all around Los Santos and spray over them the Grove Street Families' tag with a spray can. For a tag to be completely sprayed over it is needed at least 29 units of spray can "ammo". Tags and their basics are first introduced during the mission Tagging Up Turf. Spraying over an enemy tag increases the player's respect and respraying all 100 tags is required for 100% completion. The reward for finishing the work with this collectible are the weapons Molotov Cocktail, AK-47, Sawn-off Shotgun and TEC 9 delivered to the kitchen at the Johnson House, and Grove Street gang members will start to carry Desert Eagles, MP5s and knives instead of the usual pistol and TEC 9.
Locations
For locations map and photos of the graffiti see here.
- Commerce (2)
- Downtown (3)
- East Beach (8)
- East Los Santos (11)
- El Corona (6)
- Ganton (2)
- Glen Park (4)
- Idlewood (10)
- Jefferson (6)
- Las Colinas (7)
- Little Mexico (3)
- Los Flores (2)
- Los Santos International Airport (2)
- Marina (2)
- Market (4)
- Mulholland Intersection (2)
- Ocean Docks (5)
- Pershing Square (1)
- Playa del Seville (5)
- Rodeo (2)
- Santa Maria Beach (2)
- Temple (1)
- Verdant Bluffs (1)
- Verona Beach (2)
- Vinewood (1)
- Willowfield (6)
Gallery
Trivia
- If the police spot Carl spraying a tag, a Wanted Level will be applied, which should be noted with tags located in high-traffic areas. This is because the spray can is counted as a weapon, and "shooting" a weapon will cause you to attain a wanted star when the police see you, though a "real-world" perspective can also be applied in that spraying graffiti is generally considered an illegal act by itself.
- A tag is not considered completely sprayed until you see the on-screen message confirming it and you hear the confirmation sound.
- Spraying over any tags that will be used before the mission Tagging Up Turf will result in the tag being reset and you must respray every tag in that mission again.
- Before you unlock the spray can item in the Johnson house, you can find one on the rooftops of the shops directly behind the house, which can be obtained by jumping onto the low wall in the alley between the Johnson house and Ryder's house.
- The Varrios Los Aztecas gang tag is orange (like the Vagos'), however, their gang color is turquoise in the beta.
- From the start of the game up until Sweet's arrest in The Green Sabre, the Temple area is territory of the Temple Drive Families. It is only after that mission that Temple gets occupied by the Ballas, so it must have been a mistake as to why 'Temple Drive Ballas' tags are present right at the beginning.
- Spraying all the tags won't reward the player very much respect, the respect rewarded will be very small, despite the game telling you that spraying a tag will gain CJ respect in the mission Tagging Up Turf .
Video Walkthrough
See also
| Grand Theft Auto: San Andreas | |
|---|---|
| Locations | State of San Andreas (Los Santos | San Fierro | Las Venturas | Red County | Flint County | Whetstone | Tierra Robada | Bone County) |
| Characters | Carl "CJ" Johnson | Sean "Sweet" Johnson | Kendl Johnson | Melvin "Big Smoke" Harris | Lance "Ryder" Wilson | Cesar Vialpando | Frank Tenpenny | Wu Zi Mu | Mike Toreno | Ken Rosenberg |
| Content | Missions | Vehicles | Weapons | Assets | Characters | Clothing | Tattoo Parlors | Radio Stations | Gang Warfare |
| Information | 100% Completion | Achievements/Trophies | Weapon Stats | Player's Stats | Cheats | Trailers | Artworks |